<?xml version="1.0" encoding="utf-8"?><feed xmlns="http://www.w3.org/2005/Atom" ><generator uri="https://jekyllrb.com/" version="3.10.0">Jekyll</generator><link href="https://matthewritch.com/feed.xml" rel="self" type="application/atom+xml" /><link href="https://matthewritch.com/" rel="alternate" type="text/html" /><updated>2026-07-25T12:28:42-04:00</updated><id>https://matthewritch.com/feed.xml</id><title type="html">Matthew Ritch</title><subtitle>Personal website of Matthew Ritch — engineering and product professional.</subtitle><author><name>Matthew Ritch</name></author><entry><title type="html">Estimating disease prevalence by fusing pooled and individual testing</title><link href="https://matthewritch.com/blog/2026/07/24/Pooled-Prevalence-Bayesian/" rel="alternate" type="text/html" title="Estimating disease prevalence by fusing pooled and individual testing" /><published>2026-07-24T10:00:00-04:00</published><updated>2026-07-24T10:00:00-04:00</updated><id>https://matthewritch.com/blog/2026/07/24/Pooled-Prevalence-Bayesian</id><content type="html" xml:base="https://matthewritch.com/blog/2026/07/24/Pooled-Prevalence-Bayesian/"><![CDATA[<ul id="markdown-toc">
  <li><a href="#why-pool-samples-at-all" id="markdown-toc-why-pool-samples-at-all">Why pool samples at all?</a></li>
  <li><a href="#fusing-information-from-pooled-and-individual-tests" id="markdown-toc-fusing-information-from-pooled-and-individual-tests">Fusing information from pooled and individual tests</a></li>
  <li><a href="#the-closed-form-solution" id="markdown-toc-the-closed-form-solution">The closed form solution</a></li>
  <li><a href="#weighted-sum-of-betas" id="markdown-toc-weighted-sum-of-betas">Weighted sum of betas</a></li>
  <li><a href="#the-posterior-distribution" id="markdown-toc-the-posterior-distribution">The posterior distribution</a></li>
  <li><a href="#budgeting-fixed-and-pooled-tests" id="markdown-toc-budgeting-fixed-and-pooled-tests">Budgeting fixed and pooled tests</a></li>
</ul>

<p>Binary disease tests are used to estimate disease prevalence in a population. When test kits are scarce, researchers and epidemiologists may choose to test samples pooled from multiple people. Further, with observational studies and meta-analyses, you may end up with results from both indiviudal and pooled samples. To combine these results into a single estimate of the population prevalence, some prior work leapt to using compute-heavy and slow MCMC methods. We (Charles Copley, my colleague from Ancera, and I) found a closed-form posterior distribution for the population prevalence that can be computed in a fraction of a second. This post is an overview of that work. The full derivation + analysis is <a href="https://arxiv.org/abs/2308.11041">on arXiv</a>.</p>

<h2 id="why-pool-samples-at-all">Why pool samples at all?</h2>

<p>Let’s say we are trying to measure a population prevalence \(p\). If you were to sample \(n\) individuals, then you would see about \(np\) positives. Now, what if \(p=.01\)? Well you would need to sample 100 individuals to see on average 1 positive result. We can boost that signal by pooling.</p>

<p>The probability of a pooled sample testing positive when \(q\) individuals are pooled, \(\pi _q\), is equivalent to the probability that at least one of the samples which are combined into the pooled sample is positive. We’ll assume that each indiviudal’s positivity is i.i.d. Bernoulli.</p>

\[\pi_q = 1 - \Pr(\text{all }q\text{ samples negative}) = 1 - (1-p)^q\]

<p>Or, if you want to see it visually:</p>

<figure class="pv-fig" id="pv-pool">
  <div class="pv-controls">
    <label>Prevalence <span class="pv-var">p</span>
      <input type="range" id="pool-p" min="0.01" max="0.99" step="0.01" value="0.10" />
      <output id="pool-p-out">0.10</output>
    </label>
    <label>Pool size <span class="pv-var">q</span>
      <input type="range" id="pool-q" min="1" max="10" step="1" value="5" />
      <output id="pool-q-out">5</output>
    </label>
    <button type="button" class="pv-btn" id="pool-resample">🎲 Resample pool</button>
  </div>
  <div class="pv-pool-readout">
    <div class="pv-chips" id="pool-chips" aria-hidden="true"></div>
    <div class="pv-pool-status">
      <div>Pooled test: <strong id="pool-result">—</strong></div>
      <div class="pv-muted">\(\pi_q = 1-(1-p)^q = \) <span id="pool-pi">0.41</span></div>
    </div>
  </div>
  <canvas class="pv-canvas" id="pool-canvas" height="260"></canvas>
  <div class="pv-legend">
    <span class="lg"><i class="sw sw-line" style="color:var(--rb-s2)"></i>Pr(pooled positive), \(\pi_q\)</span>
    <span class="lg"><i class="sw sw-dot" style="color:var(--rb-ink)"></i>your current setting</span>
    <span class="lg"><i class="sw sw-dash" style="color:var(--rb-muted)"></i>prevalence <em>p</em></span>
  </div>
  <figcaption>Probability a pooled test comes back positive as a function of the true prevalence <em>p</em>, for a pool of <em>q</em> samples.</figcaption>
</figure>

<p>Let’s quantify the difference in information a single individual test yields vs. a single pooled test.</p>

<p>Say \(X\) is a Bernoulli random variable representing the result of an individual test. Its likelihood function over possible outcomes \(k\) is</p>

\[f(k \mid p) = p^k (1-p)^{1-k}\]

<p>Say \(Y\) is a Bernoulli random variable representing the result of a pooled test. Its likelihood function over possible outcomes \(k\) is</p>

\[g(k \mid p) = \bigg(1 - (1-p)^q\bigg)^k \bigg((1-p)^q\bigg)^{1-k}\]

<p><a href="https://en.wikipedia.org/wiki/Fisher_information">Fisher information</a> \(I(p)\) is calculated as the negative expected value of the second derivative of the log-likelihood. It is a measurement of how much information reads of a RV give us about an unknown parameter of that RV’s distribution.</p>

<p>For the individual test,</p>

\[I_X(p) =  \frac{1}{p} + \frac{1}{1-p} = \frac{1}{p(1-p)}\]

<p>For the pooled test (thank you <a href="https://www.wolframalpha.com/input?i2d=true&amp;i=+Divide%5Bd%2Cdp%5D++Divide%5Bd%2Cdp%5D++++k*ln%5C%2840%291-Power%5B%5C%2840%291-p%5C%2841%29%2Cq%5D%5C%2841%29+%2B+%5C%2840%291-k%5C%2841%29ln%5C%2840%29Power%5B%5C%2840%291-p%5C%2841%29%2Cq%5D%5C%2841%29">Wolfram Alpha</a>),</p>

\[\frac{\partial d^2}{\partial d p^2} \ln g(k \mid p) = -\frac{q\left(k(1-p)^q + kq(1-p)^q - k - 2(1-p)^q + (1-p)^{2q} + 1\right)}{(p-1)^2\left((1-p)^q - 1\right)^2}\]

<p>so</p>

\[I_Y(p) = \frac{q^2 (1-p)^{q-2}}{1-(1-p)^q}\]

<p>Notice that our \(q=1\) case matches \(I_X (p)\). So, the information ratio between these is</p>

\[\frac{I_Y(p)}{I_X(p)} = \frac{q^2 p (1-p)^{q-1}}{1-(1-p)^q}\]

<figure class="pv-fig" id="pv-info">
  <canvas class="pv-canvas" id="info-canvas" height="320"></canvas>
  <figcaption>How many individual tests one pooled test is worth, <em>I<sub>Y</sub>/I<sub>X</sub></em>, across p.</figcaption>
</figure>

<p>The ratio approaches \(q\) as \(p\rightarrow0\), meaning that at low prevalences a pooled test of \(q\) samples is up to \(q\) times as informative as an individual sample, meaning that you can get the same info for about \(q\) times as few samples.</p>

<h2 id="fusing-information-from-pooled-and-individual-tests">Fusing information from pooled and individual tests</h2>

<p>Define \(P\) as a random variable for population prevalence. We will use 
\(p\) to denote outcome values of that random variable.</p>

<p>Define \(m\) as the number of individual tests conducted.</p>

<p>Define \(Y_1,Y_2,...Y_m\) as random variables for the binary results of these individual tests.</p>

<p>Define \(y\) as the number of observed positive individual tests.</p>

<p>Define \(n\) as the number of pooled tests conducted.</p>

<p>Define \(Z_1,Z_2,...Z_n\) as random variables for the binary results of these pooled tests.</p>

<p>Define \(z\) as the number of observed positive pooled tests.</p>

<p>As before, we’ll use \(\pi_q\) for the probability of a pooled sample testing positive when \(q\) individuals are pooled.</p>

<p>In general, we assume a beta prior distribution for \(P\)
\(P \sim Beta(\alpha, \beta)\)
so</p>

\[Pr(P=p) = \frac{ p^{\alpha - 1} (1-p)^{\beta - 1}}{B(\alpha, \beta)}\]

<p>where \(B(\alpha, \beta)\) is the beta function of \(\alpha\) and \(\beta\).</p>

<p>Bayes’ Theorem can be stated for this problem as</p>

\[Pr(P=p|Y=y, Z=z) = \frac{Pr(Y=y, Z=z|P=p)Pr(P=p)}{Pr(Y=y, Z=z)}\]

\[Y \sim \text{Binomial}(m, p), \qquad Z \sim \text{Binomial}(n, \pi_q), \qquad P \sim \text{Beta}(\alpha,\beta)\]

<p>At this point, the prior work plugged these equations into an MCMC solver. We will solve \(\Pr(P=p \mid Y=y, Z=z)\) analytically instead.</p>

<h2 id="the-closed-form-solution">The closed form solution</h2>

<p>For the full derivation, you should check out <a href="https://arxiv.org/abs/2308.11041">our arxiv</a> post, but the gist is that you can use a binomial expansion of \(\pi_q^z\)</p>

\[\label{pibin}  \pi _q ^{z} = [1 - (1-p)^{q}]^{z} = \sum _{i=0} ^{z} \binom{z}{i} (-1)^{i} (1-p)^{qi}\]

<p>and linearity of integration to solve a closed form for the “evidence”, \(Pr(Y=y, Z=z)\). After a few pages of derivations, and substituting \( \gamma = y+\alpha \) and \( \delta = m-y+\beta+qn-qz \), we can derive the posterior distribution.</p>

\[\Pr(P=p \mid y, z) = \frac{\displaystyle\sum_{i=0}^{z}\binom{z}{i}(-1)^{i}\,p^{\gamma-1}(1-p)^{\delta+qi-1}}
{\displaystyle\sum_{i=0}^{z}\binom{z}{i}(-1)^{i}\,B(\gamma,\delta+qi)}\]

<p>This function is exact, integrable, and evaluates way faster than a MCMC chain. Further, if you need to include sensitivity or specificity, those generalize in the same way, even if you allow them to vary along another beta distribution.</p>

<h2 id="weighted-sum-of-betas">Weighted sum of betas</h2>

<p>One cool thing about this equation is we can rewrite it to reveal a bit of structure. The posterior is a affine combination of beta distributions!</p>

<p>Let \(f(p, \gamma, \delta + qi)\) be the PDF of the beta distribution with parameters  \(\gamma\), and \(\delta + qi\), evaluated at \(p\).</p>

<p>So we can also write the posterior probability distribution for \(P\) in this form:</p>

\[\Pr(P=p \mid y, z) = \frac{\displaystyle\sum_{i=0}^{z}\binom{z}{i}(-1)^{i}\,B(\gamma,\delta+qi)\,f(p;\gamma,\delta+qi)}
{\displaystyle\sum_{i=0}^{z}\binom{z}{i}(-1)^{i}\,B(\gamma,\delta+qi)}\]

<p>The widget below shows a given posterior’s weighted components and their sum. It also shows the closest-fitting single beta distribution.</p>

<figure class="pv-fig" id="pv-betas">
  <div class="pv-controls">
    <label>Indiv. positives <span class="pv-var">y</span>
      <input type="range" id="b-y" min="0" max="10" step="1" value="1" /><output id="b-y-out">0</output>
    </label>
    <label>Indiv. tests <span class="pv-var">m</span>
      <input type="range" id="b-m" min="1" max="10" step="1" value="5" /><output id="b-m-out">1</output>
    </label>
    <label>Pool positives <span class="pv-var">z</span>
      <input type="range" id="b-z" min="0" max="10" step="1" value="4" /><output id="b-z-out">1</output>
    </label>
    <label>Pooled tests <span class="pv-var">n</span>
      <input type="range" id="b-n" min="1" max="10" step="1" value="5" /><output id="b-n-out">1</output>
    </label>
    <label>Pool size <span class="pv-var">q</span>
      <input type="range" id="b-q" min="2" max="5" step="1" value="3" /><output id="b-q-out">3</output>
    </label>
  </div>
  <canvas class="pv-canvas" id="b-canvas" height="300"></canvas>
  <div class="pv-legend">
    <span class="lg"><i class="sw sw-line" style="color:var(--rb-ink)"></i>posterior (the signed sum)</span>
    <span class="lg"><i class="sw sw-line" style="color:var(--rb-s1)"></i>added Beta components (+)</span>
    <span class="lg"><i class="sw sw-line" style="color:var(--rb-s2)"></i>subtracted Beta components (−)</span>
    <span class="lg"><i class="sw sw-dash" style="color:var(--rb-muted)"></i>closest single Beta</span>
  </div>
</figure>

<h2 id="the-posterior-distribution">The posterior distribution</h2>

<p>Explore the posterior! Drag the sliders to set the experimental setting and see the resulting posterior. Hit resample to change the drawn data and resulting fit. You can see that pooled tests are more useful at low \(p\) and that degraded sensitivity and specificity result in a wider posterior distribution.</p>

<figure class="pv-fig" id="pv-play">
  <div class="pv-controls pv-controls-wide">
    <label>Individual tests <span class="pv-var">m</span>
      <input type="range" id="pg-m" min="0" max="60" step="1" value="20" /><output id="pg-m-out">20</output>
    </label>
    <label>Pooled tests <span class="pv-var">n</span>
      <input type="range" id="pg-n" min="0" max="60" step="1" value="20" /><output id="pg-n-out">20</output>
    </label>
    <label>Pool size <span class="pv-var">q</span>
      <input type="range" id="pg-q" min="1" max="8" step="1" value="5" /><output id="pg-q-out">5</output>
    </label>
    <label>True prevalence <span class="pv-var">P</span>
      <input type="range" id="pg-P" min="0.01" max="0.99" step="0.01" value="0.05" /><output id="pg-P-out">0.05</output>
    </label>
    <label>Sensitivity <span class="pv-var">s<sub>e</sub></span>
      <input type="range" id="pg-se" min="0.80" max="1.00" step="0.01" value="1.00" /><output id="pg-se-out">1.00</output>
    </label>
    <label>Specificity <span class="pv-var">s<sub>p</sub></span>
      <input type="range" id="pg-sp" min="0.80" max="1.00" step="0.01" value="1.00" /><output id="pg-sp-out">1.00</output>
    </label>
    <button type="button" class="pv-btn" id="pg-resample">🎲 Resample data</button>
  </div>
  <div class="pv-stats">
    <span>observed <span class="pv-var">y</span> = <strong id="pg-y">3</strong> / <span class="pv-var">m</span></span>
    <span>observed <span class="pv-var">z</span> = <strong id="pg-z">17</strong> / <span class="pv-var">n</span></span>
    <span>posterior mean = <strong id="pg-mean">—</strong></span>
    <span>95% CI = <strong id="pg-ci">—</strong></span>
  </div>
  <canvas class="pv-canvas" id="pg-canvas" height="300"></canvas>
  <div class="pv-legend">
    <span class="lg"><i class="sw sw-line" style="color:var(--rb-s1)"></i>posterior density</span>
    <span class="lg"><i class="sw sw-band" style="color:var(--rb-tent)"></i>95% credible interval</span>
    <span class="lg"><i class="sw sw-dot" style="color:var(--rb-ink)"></i>posterior mean</span>
    <span class="lg"><i class="sw sw-dash" style="color:var(--rb-s2)"></i>true prevalence</span>
  </div>
</figure>

<h2 id="budgeting-fixed-and-pooled-tests">Budgeting fixed and pooled tests</h2>

<p>So, practically, if you have a fixed test budget (who doesn’t) and you expect low prevalence, you should consider pooling. Our paper shows extensive simulation of the tradeoffs here, so check it out if you’re curious.</p>

<!-- TODO(prose): the practical takeaway. Given a fixed test budget and a rough
     prior guess at prevalence, how should you split between pooled and individual
     tests, and what q? Pooled testing shines at low prevalence (tighter CIs per
     kit); at high prevalence pools saturate and wash out. Imperfect tests degrade
     everything, worst at the extremes of P. Tie back to the arXiv sims. -->

<!-- =====================  WIDGET STYLES  ===================== -->
<style>
.pv-fig {
  margin: 1.8em auto; max-width: 640px;
  font-family: system-ui, -apple-system, "Segoe UI", sans-serif;
  --rb-surface: #fcfcfb; --rb-ink: #0b0b0b; --rb-sec: #52514e; --rb-muted: #898781;
  --rb-axis: #c3c2b7; --rb-s1: #2a78d6; --rb-s2: #eb6834;
  --rb-line: #d3d2c8; --rb-head: rgba(137,135,129,0.12);
  --rb-tent: rgba(137,135,129,0.18);
}
/* Site is light-only (no prefers-color-scheme handling in its CSS), so the
   widgets stay light to match. Reintroduce a dark block here if the site ever
   grows a dark theme. */
.pv-canvas { width: 100%; display: block; background: var(--rb-surface);
  border: 1px solid var(--rb-line); border-radius: 6px; }
.pv-fig figcaption { font-size: 0.85em; color: var(--rb-sec); margin-top: 0.7em; line-height: 1.5; text-align: center; }
.pv-controls { display: grid; grid-template-columns: 1fr 1fr; gap: 0.6em 1.2em;
  margin-bottom: 1em; align-items: center; }
.pv-controls-wide { grid-template-columns: 1fr 1fr 1fr; }
@media (max-width: 480px) { .pv-controls, .pv-controls-wide { grid-template-columns: 1fr 1fr; } }
.pv-controls label { display: flex; flex-direction: column; gap: 0.2em;
  font-size: 0.72em; letter-spacing: 0.04em; text-transform: uppercase;
  color: var(--rb-muted); font-weight: 600; }
.pv-controls input[type="range"] { width: 100%; accent-color: var(--rb-s1); margin: 0; }
.pv-controls output { color: var(--rb-ink); font-weight: 700; font-size: 1.15em;
  font-variant-numeric: tabular-nums; text-transform: none; letter-spacing: 0; }
.pv-var { color: var(--rb-s1); font-style: italic; font-weight: 700; text-transform: none; }
.pv-btn { grid-column: 1 / -1; justify-self: start; cursor: pointer;
  background: var(--rb-head); color: var(--rb-ink); border: 1px solid var(--rb-line);
  border-radius: 6px; padding: 0.45em 0.9em; font: inherit; font-size: 0.85em; font-weight: 600; }
.pv-btn:hover { border-color: var(--rb-s1); }
.pv-stats { display: flex; flex-wrap: wrap; gap: 0.4em 1.4em; justify-content: center;
  margin-bottom: 0.9em; font-size: 0.85em; color: var(--rb-sec); font-variant-numeric: tabular-nums; }
.pv-stats strong { color: var(--rb-ink); }
.pv-muted { color: var(--rb-muted); }
.pv-pool-readout { display: flex; align-items: center; gap: 1.2em; margin-bottom: 1em; flex-wrap: wrap; }
.pv-chips { display: flex; gap: 6px; flex-wrap: wrap; }
.pv-chip { width: 26px; height: 26px; border-radius: 6px; border: 1px solid var(--rb-line);
  background: var(--rb-head); transition: background 0.15s; }
.pv-chip.pos { background: var(--rb-s2); border-color: var(--rb-s2); }
.pv-pool-status { font-size: 0.9em; color: var(--rb-sec); line-height: 1.6; }
.pv-pool-status strong { color: var(--rb-ink); }
.pv-legend { display: flex; flex-wrap: wrap; gap: 0.4em 1.3em; justify-content: center;
  margin-top: 0.8em; font-size: 0.82em; color: var(--rb-sec); }
.pv-legend .lg { display: inline-flex; align-items: center; gap: 0.5em; }
.pv-legend .sw { flex: none; display: inline-block; }
.pv-legend .sw-line { width: 20px; height: 0; border-top: 3px solid currentColor; }
.pv-legend .sw-dash { width: 20px; height: 0; border-top: 2px dashed currentColor; }
.pv-legend .sw-band { width: 20px; height: 12px; border-radius: 3px; background: currentColor; }
.pv-legend .sw-dot { width: 11px; height: 11px; border-radius: 50%;
  background: currentColor; box-shadow: 0 0 0 2px var(--rb-surface); }
</style>

<!-- =====================  WIDGET SCRIPT  ===================== -->
<script>
(function () {
  // ---------- numerics ----------
  var GC = [76.18009172947146, -86.50532032941677, 24.01409824083091,
            -1.231739572450155, 0.1208650973866179e-2, -0.5395239384953e-5];
  function logGamma(x) {
    var xx = x, y = x, tmp = x + 5.5;
    tmp -= (x + 0.5) * Math.log(tmp);
    var ser = 1.000000000190015;
    for (var j = 0; j < 6; j++) { y += 1; ser += GC[j] / y; }
    return -tmp + Math.log(2.5066282746310005 * ser / xx);
  }
  function logBeta(a, b) { return logGamma(a) + logGamma(b) - logGamma(a + b); }
  function betaPdf(p, a, b) {
    if (p < 0 || p > 1) return 0;
    // endpoint limits (a, b >= 1 here): density is finite, and equals 1/B when
    // the relevant shape parameter is exactly 1. Returning 0 here would kink the curve.
    if (p === 0) return a > 1 ? 0 : (a === 1 ? Math.exp(-logBeta(a, b)) : Infinity);
    if (p === 1) return b > 1 ? 0 : (b === 1 ? Math.exp(-logBeta(a, b)) : Infinity);
    return Math.exp((a - 1) * Math.log(p) + (b - 1) * Math.log(1 - p) - logBeta(a, b));
  }
  function logChoose(n, k) {
    if (k < 0 || k > n) return -Infinity;
    return logGamma(n + 1) - logGamma(k + 1) - logGamma(n - k + 1);
  }
  function binomSample(N, pr) {
    var c = 0;
    for (var i = 0; i < N; i++) if (Math.random() < pr) c++;
    return c;
  }
  function grid(N) { var xs = []; for (var i = 0; i <= N; i++) xs.push(i / N); return xs; }

  // ---------- symlog scale on p in [0,1] (linear below `t`, log above) ----------
  // fwd: p -> [0,1] screen fraction; inv: [0,1] -> p. C1-continuous at p=t.
  // This stretches the low-prevalence region, where pooled testing matters most.
  function makeScale(mode, t) {
    if (mode === 'symlog') {
      var Tmax = 1 + Math.log(1 / t);
      return {
        mode: mode, t: t,
        fwd: function (p) { return (p <= t ? p / t : 1 + Math.log(p / t)) / Tmax; },
        inv: function (u) { var uu = u * Tmax; return uu <= 1 ? uu * t : t * Math.exp(uu - 1); }
      };
    }
    return { mode: 'linear', fwd: function (p) { return p; }, inv: function (u) { return u; } };
  }
  var PX = makeScale('symlog', 0.01);           // shared p-axis + p-slider scale
  var PTICKS = [{ v: 0, label: '0' }, { v: 0.01, label: '.01' }, { v: 0.1, label: '.1' },
                { v: 0.5, label: '.5' }, { v: 1, label: '1' }];
  // sample p uniformly in transformed space so curves stay smooth after fwd()
  function scaleGrid(N, sx) { var xs = []; for (var i = 0; i <= N; i++) xs.push(sx.inv(i / N)); return xs; }
  function interp(xs, ys, x) {
    if (x <= xs[0]) return ys[0];
    if (x >= xs[xs.length - 1]) return ys[ys.length - 1];
    for (var i = 1; i < xs.length; i++) {
      if (xs[i] >= x) {
        var tt = (x - xs[i - 1]) / Math.max(xs[i] - xs[i - 1], 1e-12);
        return ys[i - 1] + tt * (ys[i] - ys[i - 1]);
      }
    }
    return ys[ys.length - 1];
  }
  function fmtP(p) { return p >= 0.1 ? p.toFixed(2) : p.toFixed(3); }

  // ---------- palette (reads CSS vars, so it is light/dark aware) ----------
  function palette(el) {
    var cs = getComputedStyle(el), g = function (v) { return cs.getPropertyValue(v).trim(); };
    return {
      surface: g('--rb-surface'), ink: g('--rb-ink'), sec: g('--rb-sec'),
      muted: g('--rb-muted'), axis: g('--rb-axis'), s1: g('--rb-s1'),
      s2: g('--rb-s2'), tent: g('--rb-tent')
    };
  }

  // ---------- generic canvas plot ----------
  function plot(cv, root, spec) {
    var dpr = window.devicePixelRatio || 1;
    var W = cv.clientWidth || 560, H = cv.clientHeight || 280;
    cv.width = Math.round(W * dpr); cv.height = Math.round(H * dpr);
    var ctx = cv.getContext('2d'); ctx.setTransform(dpr, 0, 0, dpr, 0, 0);
    var pal = palette(root);
    ctx.clearRect(0, 0, W, H);

    var m = { l: 48, r: 16, t: 14, b: 36 };
    var xL = m.l, xR = W - m.r, yB = H - m.b, yT = m.t;
    var xmin = spec.xmin != null ? spec.xmin : 0, xmax = spec.xmax != null ? spec.xmax : 1;
    var ymax = spec.ymax, ymin = spec.ymin;
    if (ymax == null || ymin == null) {
      var mx = -Infinity, mn = Infinity;
      spec.curves.forEach(function (c) {
        c.ys.forEach(function (v) { if (isFinite(v)) { if (v > mx) mx = v; if (v < mn) mn = v; } });
      });
      if (!isFinite(mx)) mx = 1; if (!isFinite(mn)) mn = 0;
      if (ymax == null) ymax = mx * 1.12;
      if (ymin == null) ymin = Math.min(0, mn * 1.12);
    }
    if (ymax <= ymin) ymax = ymin + 1;
    var sx = spec.xscale;
    var X = sx
      ? function (x) { return xL + sx.fwd(x) * (xR - xL); }
      : function (x) { return xL + (x - xmin) / (xmax - xmin) * (xR - xL); };
    var Y = function (y) { return yB - (y - ymin) / (ymax - ymin) * (yB - yT); };

    // CI shaded band under first curve, clipped to [xlo, xhi]
    if (spec.ci) {
      var b = spec.ci;
      ctx.beginPath(); var started = false, lastX = null;
      for (var i = 0; i < b.xs.length; i++) {
        if (b.xs[i] < b.xlo || b.xs[i] > b.xhi) continue;
        var px = X(b.xs[i]), py = Y(Math.max(b.ys[i], 0));
        if (!started) { ctx.moveTo(px, Y(0)); ctx.lineTo(px, py); started = true; }
        else ctx.lineTo(px, py);
        lastX = px;
      }
      if (started) { ctx.lineTo(lastX, Y(0)); ctx.closePath(); ctx.fillStyle = b.color || pal.tent; ctx.fill(); }
    }

    // zero line when the range spans negatives
    if (ymin < 0) {
      ctx.strokeStyle = pal.axis; ctx.globalAlpha = 0.7; ctx.lineWidth = 1;
      ctx.beginPath(); ctx.moveTo(xL, Y(0)); ctx.lineTo(xR, Y(0)); ctx.stroke(); ctx.globalAlpha = 1;
    }

    // axes
    ctx.strokeStyle = pal.axis; ctx.lineWidth = 1.25;
    ctx.beginPath(); ctx.moveTo(xL, yB); ctx.lineTo(xR, yB); ctx.moveTo(xL, yT); ctx.lineTo(xL, yB); ctx.stroke();

    // vertical reference lines
    (spec.vlines || []).forEach(function (v) {
      ctx.strokeStyle = v.color || pal.muted; ctx.lineWidth = 1;
      ctx.setLineDash(v.dash || [4, 4]);
      ctx.beginPath(); ctx.moveTo(X(v.x), yT); ctx.lineTo(X(v.x), yB); ctx.stroke();
      ctx.setLineDash([]);
    });

    // horizontal reference lines
    (spec.hlines || []).forEach(function (h) {
      ctx.strokeStyle = h.color || pal.muted; ctx.lineWidth = 1;
      ctx.setLineDash(h.dash || [5, 4]);
      ctx.beginPath(); ctx.moveTo(xL, Y(h.y)); ctx.lineTo(xR, Y(h.y)); ctx.stroke();
      ctx.setLineDash([]);
    });

    // curves
    spec.curves.forEach(function (c) {
      ctx.strokeStyle = c.color; ctx.lineWidth = c.width || 2;
      ctx.globalAlpha = c.opacity != null ? c.opacity : 1;
      if (c.dash) ctx.setLineDash(c.dash);
      ctx.beginPath(); var st = false;
      for (var i = 0; i < c.xs.length; i++) {
        var v = c.ys[i]; if (!isFinite(v)) continue;
        var px = X(c.xs[i]), py = Y(v);
        if (!st) { ctx.moveTo(px, py); st = true; } else ctx.lineTo(px, py);
      }
      ctx.stroke(); ctx.setLineDash([]); ctx.globalAlpha = 1;
    });

    // markers
    (spec.markers || []).forEach(function (mk) {
      ctx.fillStyle = mk.color || pal.ink; ctx.strokeStyle = pal.surface; ctx.lineWidth = 2;
      ctx.beginPath(); ctx.arc(X(mk.x), Y(mk.y), 4.5, 0, 2 * Math.PI); ctx.fill(); ctx.stroke();
    });

    // direct series labels (used instead of a legend for the ordered q family)
    (spec.labels || []).forEach(function (lb) {
      ctx.fillStyle = lb.color || pal.ink;
      ctx.font = '600 12px system-ui,-apple-system,sans-serif';
      ctx.textAlign = lb.align || 'left'; ctx.textBaseline = 'middle';
      ctx.fillText(lb.text, X(lb.x), Y(lb.y));
    });

    // ticks + labels
    ctx.fillStyle = pal.muted; ctx.font = '11px system-ui,-apple-system,sans-serif';
    ctx.textAlign = 'center'; ctx.textBaseline = 'top';
    var xticks = spec.xticks || [{ v: 0, label: '0' }, { v: 0.5, label: '0.5' }, { v: 1, label: '1' }];
    xticks.forEach(function (t) { ctx.fillText(t.label, X(t.v), yB + 8); });
    if (spec.yticks) {
      ctx.textAlign = 'right'; ctx.textBaseline = 'middle';
      spec.yticks.forEach(function (t) { ctx.fillText(t.label, xL - 7, Y(t.v)); });
    }

    ctx.save();
    ctx.fillStyle = pal.sec; ctx.font = '12px system-ui,-apple-system,sans-serif';
    ctx.textAlign = 'center'; ctx.textBaseline = 'alphabetic';
    if (spec.xlabel) ctx.fillText(spec.xlabel, (xL + xR) / 2, H - 6);
    ctx.translate(13, (yT + yB) / 2); ctx.rotate(-Math.PI / 2); ctx.textBaseline = 'middle';
    if (spec.ylabel) ctx.fillText(spec.ylabel, 0, 0);
    ctx.restore();
  }

  // ---------- helpers to grab elements ----------
  function $(id) { return document.getElementById(id); }

  var renders = [];
  function register(cv, renderFn) {
    if (!cv) return;
    renderFn();
    if (window.ResizeObserver) { new ResizeObserver(renderFn).observe(cv); }
    renders.push(renderFn);
  }

  // =====================================================================
  // WIDGET 1 — pooling intuition toy
  // =====================================================================
  (function () {
    var root = $('pv-pool'); if (!root) return;
    var cv = $('pool-canvas');
    var chipStates = [];

    function resampleChips(q, p) {
      chipStates = [];
      for (var i = 0; i < q; i++) chipStates.push(Math.random() < p);
    }
    function drawChips() {
      var box = $('pool-chips'); box.innerHTML = '';
      var anyPos = false;
      for (var i = 0; i < chipStates.length; i++) {
        var d = document.createElement('div');
        d.className = 'pv-chip' + (chipStates[i] ? ' pos' : '');
        box.appendChild(d);
        if (chipStates[i]) anyPos = true;
      }
      $('pool-result').textContent = anyPos ? 'POSITIVE' : 'negative';
      $('pool-result').style.color = anyPos ? 'var(--rb-s2)' : 'var(--rb-muted)';
    }
    function poolP() { return Math.min(Math.max(PX.inv(parseFloat($('pool-p').value)), 0.002), 0.998); }
    function render() {
      var p = poolP(), q = parseInt($('pool-q').value, 10);
      $('pool-p-out').textContent = fmtP(p);
      $('pool-q-out').textContent = q;
      var pi = 1 - Math.pow(1 - p, q);
      $('pool-pi').textContent = pi.toFixed(3);
      if (chipStates.length !== q) resampleChips(q, p);
      drawChips();
      var xs = scaleGrid(300, PX), ys = xs.map(function (x) { return 1 - Math.pow(1 - x, q); });
      plot(cv, root, {
        curves: [{ xs: xs, ys: ys, color: palette(root).s2, width: 2.5 }],
        ymin: 0, ymax: 1.05, xscale: PX, xticks: PTICKS,
        vlines: [{ x: p, color: palette(root).muted }],
        markers: [{ x: p, y: pi }],
        xlabel: 'true prevalence  p (symlog)', ylabel: 'Pr(pooled test positive)'
      });
    }
    var psl = $('pool-p'); var poolDefault = parseFloat(psl.value);
    psl.min = 0; psl.max = 1; psl.step = 0.005; psl.value = PX.fwd(poolDefault);
    psl.addEventListener('input', function () { resampleChips(parseInt($('pool-q').value, 10), poolP()); render(); });
    $('pool-q').addEventListener('input', function () { resampleChips(parseInt($('pool-q').value, 10), poolP()); render(); });
    $('pool-resample').addEventListener('click', function () {
      resampleChips(parseInt($('pool-q').value, 10), poolP()); render();
    });
    register(cv, render);
  })();

  // =====================================================================
  // WIDGET 2 — posterior playground (grid evaluation, stable)
  // =====================================================================
  (function () {
    var root = $('pv-play'); if (!root) return;
    var cv = $('pg-canvas');
    var N = 400;
    var data = { y: 0, z: 0 };

    function safeTerm(count, val) { // count * log(val), with 0*log(0)=0
      if (count === 0) return 0;
      if (val <= 0) return -Infinity;
      return count * Math.log(val);
    }
    function rates(p, q, se, sp) {
      var a = se * p + (1 - sp) * (1 - p);            // indiv positive prob
      var pi = 1 - Math.pow(1 - p, q);
      var b = se * pi + (1 - sp) * (1 - pi);          // pooled positive prob
      return { a: a, b: b };
    }
    function readModel() {
      return {
        m: parseInt($('pg-m').value, 10), n: parseInt($('pg-n').value, 10),
        q: parseInt($('pg-q').value, 10),
        P: Math.min(Math.max(PX.inv(parseFloat($('pg-P').value)), 0.002), 0.998),
        se: parseFloat($('pg-se').value), sp: parseFloat($('pg-sp').value)
      };
    }
    function expectedData(mdl) {
      var r = rates(mdl.P, mdl.q, mdl.se, mdl.sp);
      data.y = Math.round(mdl.m * r.a);
      data.z = Math.round(mdl.n * r.b);
    }
    function resampleData(mdl) {
      var r = rates(mdl.P, mdl.q, mdl.se, mdl.sp);
      data.y = binomSample(mdl.m, r.a);
      data.z = binomSample(mdl.n, r.b);
    }

    function posterior(mdl) {
      // grid is uniform in transformed space, so intervals in p are non-uniform:
      // every trapezoid uses its own width dp = xs[i] - xs[i-1].
      var xs = scaleGrid(N, PX), us = [], i;
      for (i = 0; i <= N; i++) {
        var p = Math.min(Math.max(xs[i], 1e-9), 1 - 1e-9);
        var r = rates(p, mdl.q, mdl.se, mdl.sp);
        var lu = safeTerm(data.y, r.a) + safeTerm(mdl.m - data.y, 1 - r.a)
               + safeTerm(data.z, r.b) + safeTerm(mdl.n - data.z, 1 - r.b);
        us.push(lu);
      }
      var lmax = -Infinity;
      for (i = 0; i <= N; i++) if (us[i] > lmax) lmax = us[i];
      var u = us.map(function (l) { return isFinite(l) ? Math.exp(l - lmax) : 0; });
      // trapezoid normalization + mean + CDF (variable spacing)
      var Z = 0, mean = 0, i2, dp;
      for (i2 = 1; i2 <= N; i2++) {
        dp = xs[i2] - xs[i2 - 1];
        Z += 0.5 * (u[i2] + u[i2 - 1]) * dp;
        mean += 0.5 * (xs[i2] * u[i2] + xs[i2 - 1] * u[i2 - 1]) * dp;
      }
      var dens = u.map(function (v) { return v / Z; });
      mean = mean / Z;
      // CDF and quantiles
      var cdf = [0], acc = 0;
      for (i2 = 1; i2 <= N; i2++) { acc += 0.5 * (dens[i2] + dens[i2 - 1]) * (xs[i2] - xs[i2 - 1]); cdf.push(acc); }
      function quantile(qq) {
        for (var k = 1; k <= N; k++) {
          if (cdf[k] >= qq) {
            var t = (qq - cdf[k - 1]) / Math.max(cdf[k] - cdf[k - 1], 1e-12);
            return xs[k - 1] + t * (xs[k] - xs[k - 1]);
          }
        }
        return 1;
      }
      return { xs: xs, dens: dens, mean: mean, lo: quantile(0.025), hi: quantile(0.975) };
    }

    function render() {
      var mdl = readModel();
      if (data.y > mdl.m) data.y = mdl.m;
      if (data.z > mdl.n) data.z = mdl.n;
      $('pg-m-out').textContent = mdl.m; $('pg-n-out').textContent = mdl.n;
      $('pg-q-out').textContent = mdl.q; $('pg-P-out').textContent = fmtP(mdl.P);
      $('pg-se-out').textContent = mdl.se.toFixed(2); $('pg-sp-out').textContent = mdl.sp.toFixed(2);
      $('pg-y').textContent = data.y; $('pg-z').textContent = data.z;

      var post = posterior(mdl);
      $('pg-mean').textContent = post.mean.toFixed(3);
      $('pg-ci').textContent = '[' + post.lo.toFixed(3) + ', ' + post.hi.toFixed(3) + ']';
      var meanDens = interp(post.xs, post.dens, post.mean);
      plot(cv, root, {
        curves: [{ xs: post.xs, ys: post.dens, color: palette(root).s1, width: 2.5 }],
        ymin: 0, xscale: PX, xticks: PTICKS,
        ci: { xs: post.xs, ys: post.dens, xlo: post.lo, xhi: post.hi, color: palette(root).tent },
        vlines: [{ x: mdl.P, color: palette(root).s2, dash: [5, 4] }],
        markers: [{ x: post.mean, y: meanDens }],
        xlabel: 'prevalence  p (symlog)', ylabel: 'posterior density'
      });
    }
    // default prevalence comes from the input's HTML value= attribute (in real p),
    // then we switch the slider into transformed symlog units.
    var Psl = $('pg-P'); var pDefault = parseFloat(Psl.value);
    Psl.min = 0; Psl.max = 1; Psl.step = 0.005; Psl.value = PX.fwd(pDefault);
    ['pg-m', 'pg-n', 'pg-q', 'pg-P', 'pg-se', 'pg-sp'].forEach(function (id) {
      $(id).addEventListener('input', function () { expectedData(readModel()); render(); });
    });
    $('pg-resample').addEventListener('click', function () { resampleData(readModel()); render(); });

    expectedData(readModel());
    register(cv, render);
  })();

  // =====================================================================
  // WIDGET 3 — sum-of-betas reveal (closed form, small counts)
  // =====================================================================
  (function () {
    var root = $('pv-betas'); if (!root) return;
    var cv = $('b-canvas');
    var alpha = 1, beta = 1, N = 300;

    function render() {
      var y = parseInt($('b-y').value, 10), m = parseInt($('b-m').value, 10);
      var z = parseInt($('b-z').value, 10), n = parseInt($('b-n').value, 10);
      var q = parseInt($('b-q').value, 10);
      if (y > m) { y = m; $('b-y').value = y; }
      if (z > n) { z = n; $('b-z').value = z; }
      $('b-y-out').textContent = y; $('b-m-out').textContent = m;
      $('b-z-out').textContent = z; $('b-n-out').textContent = n; $('b-q-out').textContent = q;

      var gamma = y + alpha;
      var delta = m - y + beta + q * n - q * z;

      // signed weights w_i = C(z,i)(-1)^i B(gamma, delta+qi); components Beta(gamma, delta+qi)
      var comps = [], S = 0;
      for (var i = 0; i <= z; i++) {
        var A = gamma, B = delta + q * i;
        var w = Math.exp(logChoose(z, i) + logBeta(A, B)) * (i % 2 === 0 ? 1 : -1);
        comps.push({ A: A, B: B, w: w });
        S += w;
      }
      var xs = scaleGrid(N, PX);
      var pal = palette(root);
      var curves = [];
      // components (signed, normalized)
      comps.forEach(function (c, i) {
        var wn = c.w / S;
        var ys = xs.map(function (p) { return wn * betaPdf(p, c.A, c.B); });
        curves.push({ xs: xs, ys: ys, color: i % 2 === 0 ? pal.s1 : pal.s2, width: 1.4, opacity: 0.55 });
      });
      // the posterior sum
      var sum = xs.map(function (p, k) {
        var s = 0; comps.forEach(function (c) { s += (c.w / S) * betaPdf(p, c.A, c.B); }); return s;
      });
      // closest single Beta by method of moments
      var mu1 = 0, mu2 = 0;
      comps.forEach(function (c) {
        var wn = c.w / S, ab = c.A + c.B;
        mu1 += wn * (c.A / ab);
        mu2 += wn * (c.A * (c.A + 1) / (ab * (ab + 1)));
      });
      var v = mu2 - mu1 * mu1;
      if (v > 1e-9 && mu1 > 0 && mu1 < 1) {
        var common = mu1 * (1 - mu1) / v - 1;
        var fa = mu1 * common, fb = (1 - mu1) * common;
        if (fa > 0 && fb > 0) {
          var fit = xs.map(function (p) { return betaPdf(p, fa, fb); });
          curves.push({ xs: xs, ys: fit, color: pal.muted, width: 1.6, dash: [5, 4] });
        }
      }
      curves.push({ xs: xs, ys: sum, color: pal.ink, width: 2.8 });

      plot(cv, root, {
        curves: curves, xscale: PX, xticks: PTICKS,
        xlabel: 'prevalence  p (symlog)', ylabel: 'density'
      });
    }
    ['b-y', 'b-m', 'b-z', 'b-n', 'b-q'].forEach(function (id) {
      $(id).addEventListener('input', render);
    });
    register(cv, render);
  })();

  // =====================================================================
  // WIDGET 4 — relative Fisher information, pooled vs individual, across q
  // =====================================================================
  (function () {
    var root = $('pv-info'); if (!root) return;
    var cv = $('info-canvas');
    var N = 320;
    // I_Y/I_X = q^2 p (1-p)^(q-1) / (1 - (1-p)^q);  -> q as p->0, -> 0 as p->1
    function ratio(p, q) { return q * q * p * Math.pow(1 - p, q - 1) / (1 - Math.pow(1 - p, q)); }
    // sequential blue ramp (light -> dark = small -> large q); site is light-only
    var QS = [{ q: 2, c: '#9ec3ea' }, { q: 4, c: '#5b9be0' }, { q: 6, c: '#2a78d6' }, { q: 8, c: '#17539e' }];
    function render() {
      var pal = palette(root);
      var xs = scaleGrid(N, PX);
      var curves = [], labels = [];
      QS.forEach(function (o) {
        var ys = xs.map(function (p) { return ratio(Math.min(Math.max(p, 1e-9), 1 - 1e-9), o.q); });
        curves.push({ xs: xs, ys: ys, color: o.c, width: 2.4 });
        // label at the left plateau, where each curve sits near height q (well separated)
        labels.push({ x: 0.013, y: ratio(0.013, o.q) + 0.28, text: 'q = ' + o.q, color: o.c, align: 'left' });
      });
      labels.push({ x: 0.02, y: .75, text: 'q = 1  (individual test)', color: pal.muted, align: 'right' });
      plot(cv, root, {
        curves: curves, xscale: PX, xticks: PTICKS,
        ymin: 0, ymax: 8.7,
        yticks: [{ v: 0, label: '0' }, { v: 1, label: '1' }, { v: 2, label: '2' },
                 { v: 4, label: '4' }, { v: 6, label: '6' }, { v: 8, label: '8' }],
        hlines: [{ y: 1, color: pal.muted, dash: [5, 4] }],
        labels: labels,
        xlabel: 'prevalence  p (symlog)', ylabel: 'info ratio  (pooled ÷ individual)'
      });
    }
    register(cv, render);
  })();

  // ---------- re-render everything on theme flip ----------
  if (window.matchMedia) {
    var mq = window.matchMedia('(prefers-color-scheme: dark)');
    var relay = function () { renders.forEach(function (r) { r(); }); };
    if (mq.addEventListener) mq.addEventListener('change', relay);
    else if (mq.addListener) mq.addListener(relay);
  }
})();
</script>]]></content><author><name>Matthew Ritch</name></author><category term="blog" /><category term="bayesian statistics" /><category term="probability" /><category term="epidemiology" /><summary type="html"><![CDATA[Turning our arXiv paper into an interactive walk-through. Combine pooled and individual disease tests into a single closed-form Bayesian posterior for population prevalence sans MCMC.]]></summary><media:thumbnail xmlns:media="http://search.yahoo.com/mrss/" url="https://matthewritch.com/images/fusion-og.png" /><media:content medium="image" url="https://matthewritch.com/images/fusion-og.png" xmlns:media="http://search.yahoo.com/mrss/" /></entry><entry><title type="html">Solving Jane Street’s Robot Baseball Puzzle: Markov Games and Golden Section Search</title><link href="https://matthewritch.com/blog/2026/07/22/Puzzles-Robot-Baseball/" rel="alternate" type="text/html" title="Solving Jane Street’s Robot Baseball Puzzle: Markov Games and Golden Section Search" /><published>2026-07-22T17:00:00-04:00</published><updated>2026-07-22T17:00:00-04:00</updated><id>https://matthewritch.com/blog/2026/07/22/Puzzles-Robot-Baseball</id><content type="html" xml:base="https://matthewritch.com/blog/2026/07/22/Puzzles-Robot-Baseball/"><![CDATA[<ul id="markdown-toc">
  <li><a href="#modeling-a-single-turn-zero-sum-game" id="markdown-toc-modeling-a-single-turn-zero-sum-game">Modeling a Single-Turn Zero-Sum Game</a></li>
  <li><a href="#modeling-a-simultaneous-move-markov-game" id="markdown-toc-modeling-a-simultaneous-move-markov-game">Modeling a Simultaneous-Move Markov Game</a></li>
  <li><a href="#visualizing-the-value-and-reach-probability-as-functions-of-p" id="markdown-toc-visualizing-the-value-and-reach-probability-as-functions-of-p">Visualizing the Value and Reach Probability as Functions of p</a></li>
  <li><a href="#black-box-search-and-solving-the-puzzle" id="markdown-toc-black-box-search-and-solving-the-puzzle">Black Box Search and Solving the Puzzle</a></li>
</ul>

<p>Recently, I have been enjoying solving Jane Street’s backlog of <a href="https://www.janestreet.com/puzzles">puzzles</a>. Last night, I solved <a href="https://www.janestreet.com/puzzles/robot-baseball-index/">Robot Baseball</a> from October 2025. This post is my write-up of the math I learned while solving it, so if you haven’t already, take a second to read the puzzle!</p>

<p>In brief, Robot Baseball is a <a href="https://en.wikipedia.org/wiki/Stochastic_game">Markov game</a>. Its states are numbers of balls and strikes. The game ends when balls=4 or strikes=3. To find the <a href="https://en.wikipedia.org/wiki/Nash_equilibrium">Nash equilibria</a> at each state, we need to first model the terminal states and then use backward induction to solve each <a href="https://en.wikipedia.org/wiki/Subgame_perfect_equilibrium">subgame equilibrium</a> until we have found an equilibrium for each possible state.</p>

<p>The catch is that if the pitcher throws a strike and the batter swings, the batter hits with probability \(p\) and misses with probability \(1 - p\). We want to optimize \(p\) to maximize our odds of reaching \((\text{balls}=3, \text{strikes}=2)\). The players’ payoffs at each step and their equilibrium strategies are therefore functions of \(p\). This is straightforward symbolically when we are calculating the equilibrium for \((\text{balls}=3, \text{strikes}=2)\), but over the many inductive steps back to the initial state of the game, those symbolic expressions blow up into an ungodly hard-to-compute-precisely large polynomials of \(p\).</p>

<p>The key is to realize that</p>

<p>1) For a given \(p\), the equilibria for the full game can be computed very quickly</p>

<p>2) \(\Pr(\text{balls}=3, \text{strikes}=2)\) when viewed as a function of \(p\) has a single maximum value</p>

<p>These two things mean that we can use a black box search algorithm like golden section search to compute the \(p\) that maximizes \(\Pr(\text{balls}=3, \text{strikes}=2)\) to arbitrary precision.</p>

<p>Now, let’s go through the derivations and solution in detail.</p>

<h2 id="modeling-a-single-turn-zero-sum-game">Modeling a Single-Turn Zero-Sum Game</h2>

<p>Let’s forget everything about robot baseball for a minute and think about a very simple game.</p>

<p>Player 1 has a choice to select Top or Bottom. They select Top with some probability \(p\) and Bottom with probability \(1-p\).</p>

<p>Player 2 has a choice to select Left or Right. They select Left with some probability \(q\) and Right with probability \(1-q\).</p>

<p>Let’s say there are 4 outcomes possible depending on the combination of actions the players take. The players choose actions simultaneously.</p>

<p>Let’s say that this is a zero-sum game, meaning that for a given outcome Player 1’s gain is equivalent to Player 2’s loss. We’ll put those payoffs in terms of gains or losses for Player 1 and leave them as variables:  \(a, b, c, d\). Remember that a benefit of \(a\) to Player 1 is a benefit of \(-a\) to Player 2.</p>

<p>We’ll also assume that both players have total knowledge of the game’s payoff matrix.</p>

<p>We can record this setup for the game in a payoff matrix.</p>

<table class="payoff-matrix">
  <tr>
    <td class="pm-group"></td>
    <td class="pm-group"></td>
    <th class="pm-group" colspan="2">Player 2</th>
  </tr>
  <tr>
    <td class="pm-group"></td>
    <td class="pm-group"></td>
    <th class="pm-act">Left, \(q\)</th>
    <th class="pm-act">Right, \(1-q\)</th>
  </tr>
  <tr>
    <th class="pm-group rot" rowspan="2"><span>Player 1</span></th>
    <th class="pm-act">Top, \(p\)</th>
    <td class="pm-pay">\(a\)</td>
    <td class="pm-pay">\(b\)</td>
  </tr>
  <tr>
    <th class="pm-act">Bottom, \(1-p\)</th>
    <td class="pm-pay">\(c\)</td>
    <td class="pm-pay">\(d\)</td>
  </tr>
</table>

<style>
.payoff-matrix {
  --pm-line: #d3d2c8;
  --pm-head: rgba(137, 135, 129, 0.12);
  --pm-cell: #fcfcfb;
  --pm-ink: #1a1a19;
  --pm-muted: #6f6e69;
  border-collapse: collapse;
  margin: 1.6em auto;
  color: var(--pm-ink);
  font-variant-numeric: tabular-nums;
  line-height: 1.2;
}
.payoff-matrix th, .payoff-matrix td { padding: 0.6em 1em; text-align: center; }
/* outer "who is choosing" labels — muted, borderless */
.payoff-matrix .pm-group {
  border: none; background: none;
  color: var(--pm-muted); font-weight: 600;
  font-size: 0.78em; letter-spacing: 0.05em; text-transform: uppercase;
}
/* rotated left-hand label */
.payoff-matrix .rot span {
  writing-mode: vertical-rl; transform: rotate(180deg); display: inline-block;
}
/* action headers */
.payoff-matrix .pm-act {
  border: 1px solid var(--pm-line); background: var(--pm-head); font-weight: 600;
}
/* payoff cells (values are Player 1 / the batter's expected score) */
.payoff-matrix .pm-pay {
  border: 1px solid var(--pm-line); background: var(--pm-cell); min-width: 5.5em;
}
</style>

<p>Now, we want to model the expected payoffs for each player across the set of strategies they can choose to identify their optimal strategies.</p>

<p>For shorthand, we’ll use \(\operatorname{E}[L]\) for Player 1’s expected score if Player 2 chooses Left and \(\operatorname{E}[R]\) for Player 1’s expected score if Player 2 chooses Right.</p>

\[\operatorname{E}[L] = pa + (1-p)c = c + (a-c)p\]

\[\operatorname{E}[R] = pb + (1-p)d = d + (b-d)p\]

<p>If Player 1 picks \(p\) so that \(\operatorname{E}[L] &gt; \operatorname{E}[R]\), Player 2 could win more by picking Right, and vice versa. To maximize their score against any opponent, including one that knows their strategy, Player 1 wants to maximize \(\min(\operatorname{E}[L], \operatorname{E}[R])\).</p>

<p>We can graph both expectations as functions of \(p\):</p>

<figure class="rb-fig">
  <svg viewBox="0 0 640 420" role="img" aria-labelledby="rb-title rb-desc" xmlns="http://www.w3.org/2000/svg">
    <title id="rb-title">Player 1's payoff versus p</title>
    <desc id="rb-desc">Two straight lines, E[L] and E[R], plotted against p. E[L] rises and E[R] falls, crossing at p-star. The lower of the two lines forms a tent shape whose peak, at the crossing, is the highest payoff Player 1 can guarantee.</desc>

    <!-- < min(E[L], E[R]) -->
    <polygon points="56,315 352.4,178.2 550,201 550,372 56,372" fill="var(--rb-tent)" />

    <!-- axes -->
    <path d="M56 372 L550 372" stroke="var(--rb-axis)" stroke-width="1.5" />
    <path d="M56 30 L56 372" stroke="var(--rb-axis)" stroke-width="1.5" />

    <!-- droplines to p* and V -->
    <path d="M352.4 178.2 L352.4 372" stroke="var(--rb-muted)" stroke-width="1" stroke-dasharray="4 4" />
    <path d="M352.4 178.2 L56 178.2" stroke="var(--rb-muted)" stroke-width="1" stroke-dasharray="4 4" />

    <!-- max(E[L], E[R]) -->
    <path d="M352.4 178.2 L550 87" stroke="var(--rb-s1)" stroke-width="2" stroke-opacity="0.3" fill="none" />
    <path d="M56 144 L352.4 178.2" stroke="var(--rb-s2)" stroke-width="2" stroke-opacity="0.3" fill="none" />

    <!-- min(E[L], E[R]) -->
    <path d="M56 315 L352.4 178.2" stroke="var(--rb-s1)" stroke-width="2.5" fill="none" />
    <path d="M352.4 178.2 L550 201" stroke="var(--rb-s2)" stroke-width="2.5" fill="none" />

    <!-- peak -->
    <path d="M352.4 70 L352.4 170" stroke="var(--rb-muted)" stroke-width="1" stroke-dasharray="3 3" />
    <circle cx="352.4" cy="178.2" r="5" fill="var(--rb-ink)" stroke="var(--rb-surface)" stroke-width="2" />

    <!-- series labels -->
    <text x="556" y="90" fill="var(--rb-s1)" font-size="14" font-weight="600">E[L]</text>
    <text x="556" y="205" fill="var(--rb-s2)" font-size="14" font-weight="600">E[R]</text>


    <!-- region labels -->
    <text x="200" y="352" fill="var(--rb-muted)" font-size="12" text-anchor="middle">Player 2 picks Left</text>
    <text x="458" y="352" fill="var(--rb-muted)" font-size="12" text-anchor="middle">Player 2 picks Right</text>

    <!-- tick labels -->
    <text x="56" y="390" fill="var(--rb-muted)" font-size="11" text-anchor="middle">0</text>
    <text x="352.4" y="390" fill="var(--rb-muted)" font-size="11" text-anchor="middle">p*</text>
    <text x="550" y="390" fill="var(--rb-muted)" font-size="11" text-anchor="middle">1</text>
    <text x="48" y="182" fill="var(--rb-muted)" font-size="11" text-anchor="end">V</text>
    <text x="48" y="376" fill="var(--rb-muted)" font-size="11" text-anchor="end">0</text>

    <!-- axis titles -->
    <text x="303" y="410" fill="var(--rb-sec)" font-size="12" text-anchor="middle">p</text>
    <text x="18" y="201" fill="var(--rb-sec)" font-size="12" text-anchor="middle" transform="rotate(-90 18 201)">Player 1's expected payoff</text>
  </svg>
</figure>

<style>
.rb-fig {
  margin: 1.5em auto; max-width: 640px; text-align: center;
  font-family: system-ui, -apple-system, "Segoe UI", sans-serif;
  --rb-surface: #fcfcfb; --rb-ink: #0b0b0b; --rb-sec: #52514e; --rb-muted: #898781;
  --rb-axis: #c3c2b7; --rb-s1: #2a78d6; --rb-s2: #eb6834;
  --rb-tent: rgba(137,135,129,0.15);
}
.rb-fig svg { width: 100%; height: auto; overflow: visible; }
.rb-fig figcaption { font-size: 0.85em; color: var(--rb-sec); margin-top: 0.6em; line-height: 1.4; }
@media (prefers-color-scheme: dark) {
  .rb-fig {
    --rb-surface: #1a1a19; --rb-ink: #ffffff; --rb-sec: #c3c2b7; --rb-muted: #898781;
    --rb-axis: #383835; --rb-s1: #3987e5; --rb-s2: #d95926;
    --rb-tent: rgba(137,135,129,0.22);
  }
}
</style>

<p>\(\min(\operatorname{E}[L], \operatorname{E}[R])\) is concave, so it will have some maximum within \([0,1]\). If that max \(\in\{0, 1\}\), then Player 1 will just always pick one of their options because it will always be better.</p>

<p>Otherwise, that  \(\max(\min(\operatorname{E}[L], \operatorname{E}[R]))\) will occur at the intersection of \(\operatorname{E}[L] = \operatorname{E}[R]\). Therefore, Player 1 selects \(p\) to meet that condition:</p>

\[\operatorname{E}[L] = \operatorname{E}[R]\]

\[c + (a-c)p = d + (b-d)p\]

\[c - d = (b-d-a+c)p\]

\[p = \frac{c-d}{b-d-a+c}\]

<p>You can do the same calculation for \(q\).</p>

<p>These strategies \(p\) and \(q\) are this game’s Nash equilibrium.</p>

<h2 id="modeling-a-simultaneous-move-markov-game">Modeling a Simultaneous-Move Markov Game</h2>

<p>Markov games are repeated games where the players progress through game states where some or all of the progression probabilities are stochastic. Robot Baseball is a simultaneous-move Markov game.</p>

<p>Let’s call the game state where \(b\) is the number of balls and \(s\) is the number of strikes \((b,s)\).</p>

<p>Let’s call the expected value of a state of the game for the batter \(V(b,s)\). This is a zero-sum game, so the expected value for the pitcher would be \(-V(b,s)\).</p>

<p>We know that \(V(4,s) = 1\) and \(V(b,3) = 0\) for any values of b or s. A home run has a value of 4. These are our terminal states.</p>

<p>To model this game, we will need to start from these known terminal states and work backwards via induction. First, let’s set up our game’s payoff table for an arbitrary state \((b,s)\). We will put the values of the next states in terms of our function V so this can be used as a recurrence relation.</p>

<p>Remember from the question that we do not know \(p\), which is the probability that StrikexSwing will net a home run.</p>

<p>Let’s simplify our notation a bit by substituting \(X=V(b+1,s)\) and \(Y=V(b,s+1)\).</p>

<table class="payoff-matrix">
  <tr>
    <td class="pm-group"></td>
    <td class="pm-group"></td>
    <th class="pm-group" colspan="2">Batter</th>
  </tr>
  <tr>
    <td class="pm-group"></td>
    <td class="pm-group"></td>
    <th class="pm-act">Ball, \(q\)</th>
    <th class="pm-act">Strike, \(1-q\)</th>
  </tr>
  <tr>
    <th class="pm-group rot" rowspan="2"><span>Pitcher</span></th>
    <th class="pm-act">Wait, \(r\)</th>
    <td class="pm-pay">\(X\)</td>
    <td class="pm-pay">\(Y\)</td>
  </tr>
  <tr>
    <th class="pm-act">Swing, \(1-r\)</th>
    <td class="pm-pay">\(Y\)</td>
    <td class="pm-pay">\(4p + (1-p)Y\)</td>
  </tr>
</table>

<p>Let’s find the Nash equilibrium for this state of the game.</p>

\[V(b,s) = \operatorname{E}[\text{Wait}] = \operatorname{E}[\text{Swing}]\]

\[qX + (1-q)Y = qY + (1-q)[4p + (1-p)Y]\]

<p>Rearrange to see that</p>

\[q = \frac{p(4-Y)}{X-Y+p(4-Y)}\]

<p>and we can see by the symmetry of the payoff matrix that \(r = q\).</p>

<p>So, we can find a general form for \(V(b,s)\):</p>

\[V(b,s) = \operatorname{E}[\text{Wait}]\]

\[= qX + (1-q)Y\]

\[= \frac{X\big(Y+p(4-Y)\big) - Y^2}{X-2Y+4p+(1-p)Y}\]

<p>Which is a recurrence relation that can combine this with our boundary values \(V(4,s) = 1\) and \(V(b,3) = 0\) to calculate any \(V(b,s)\). This process is called Backward Induction.</p>

<p>Calculating \(V(b,s)\) symbolically yields a a rational function in \(p\) with degree-49 numerator and denominator with huge coefficients, but luckily we don’t need to do that. Calculating the full table of values for \(V(b,s)\) given some value for \(p\) can be done very quickly, which will be enough for us.</p>

<p>Now, since we know \(q\) and \(r\) at each possible state of the game, we can calculate transition probabilities between states. Remember that \(q\)=\(r\)</p>

<p>At state \((b,s)\):</p>

\[P(T_{n+1} \mid T_n = (b,s)) = \begin{cases} 
q^2 &amp; \text{if } (b+1, s) \\ 
2q(1-q) + (1-p)(1-q)^2 &amp; \text{if } (b, s+1) \\ 
p(1-q)^2 &amp; \text{if } \text{Homer} 
\end{cases}\]

<p>We want to maximize our odds of getting to \((3,2)\).</p>

<p>Call \(R(b,s)\) the probability of reaching \((3,2)\) from \((b,s)\).</p>

\[R(3,2)=1\]

\[R(b,3) = R(4,s) = 0,\]

<p>From reading off our transition table, we can see that</p>

\[R(b,s) = q^2 R(b+1,s) + [2q-2q^2 + (1-p)(1-q)^2]R(b,s+1)\]

\[= q^2 R(b+1,s) + [1-q^2 - p(1-q)^2]R(b,s+1)\]

<p>I’ve skipped it here to simplify notation, but remember that \(q\) is itself a function of \((b,s)\). So, we have another recurrence relation that we can combine with our recurrence relation for \(V(b,s)\) to calculate \(R(0,0)\). \(R(0,0)\) is another insane rational function of \(p\), but luckily again, we won’t need to use that symbolic form. Given some \(p\), we can quickly calculate \(R(0,0)\).</p>

<h2 id="visualizing-the-value-and-reach-probability-as-functions-of-p">Visualizing the Value and Reach Probability as Functions of p</h2>

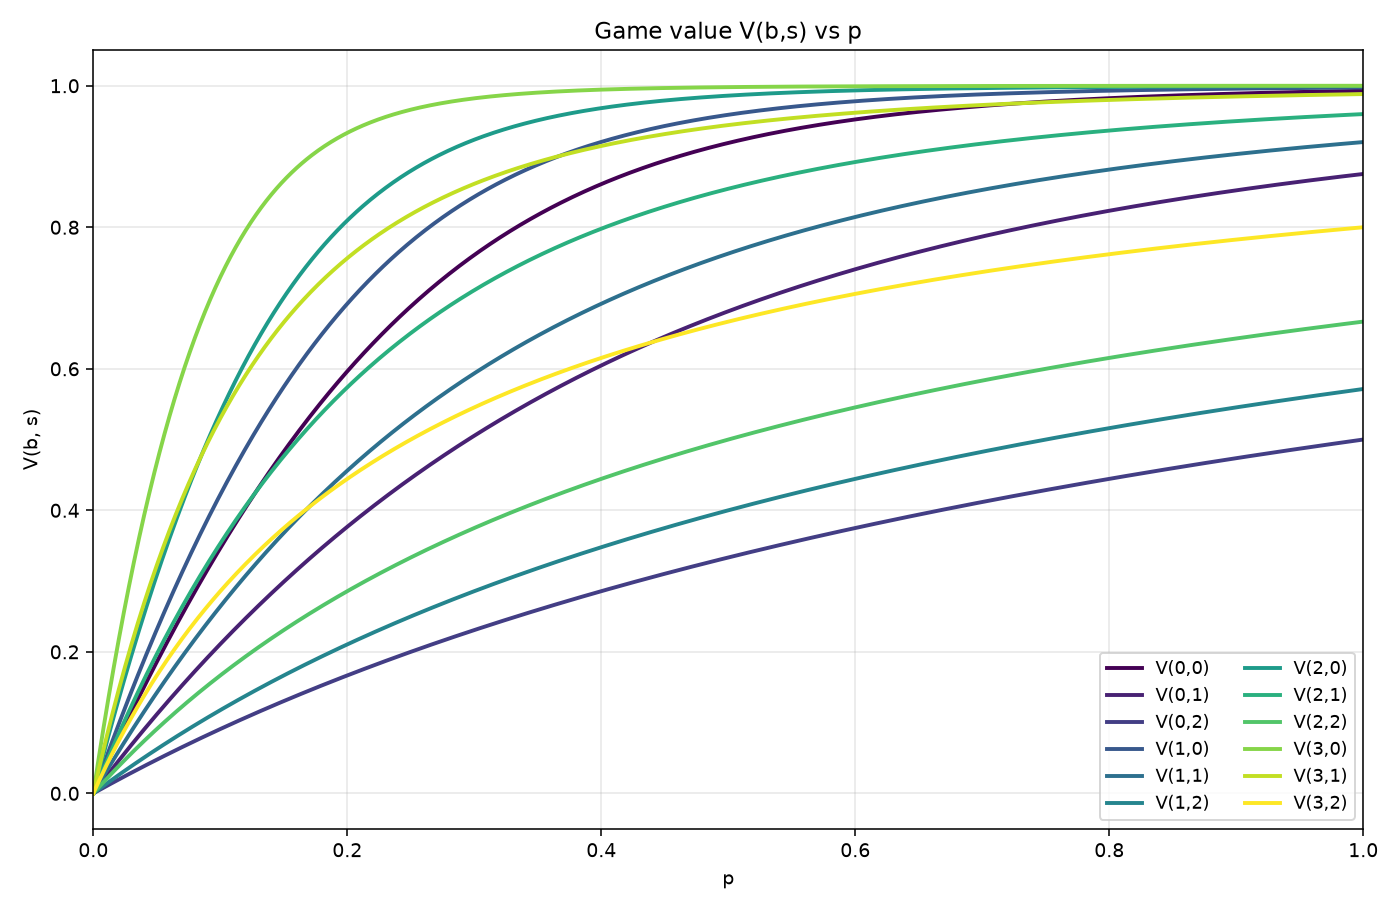
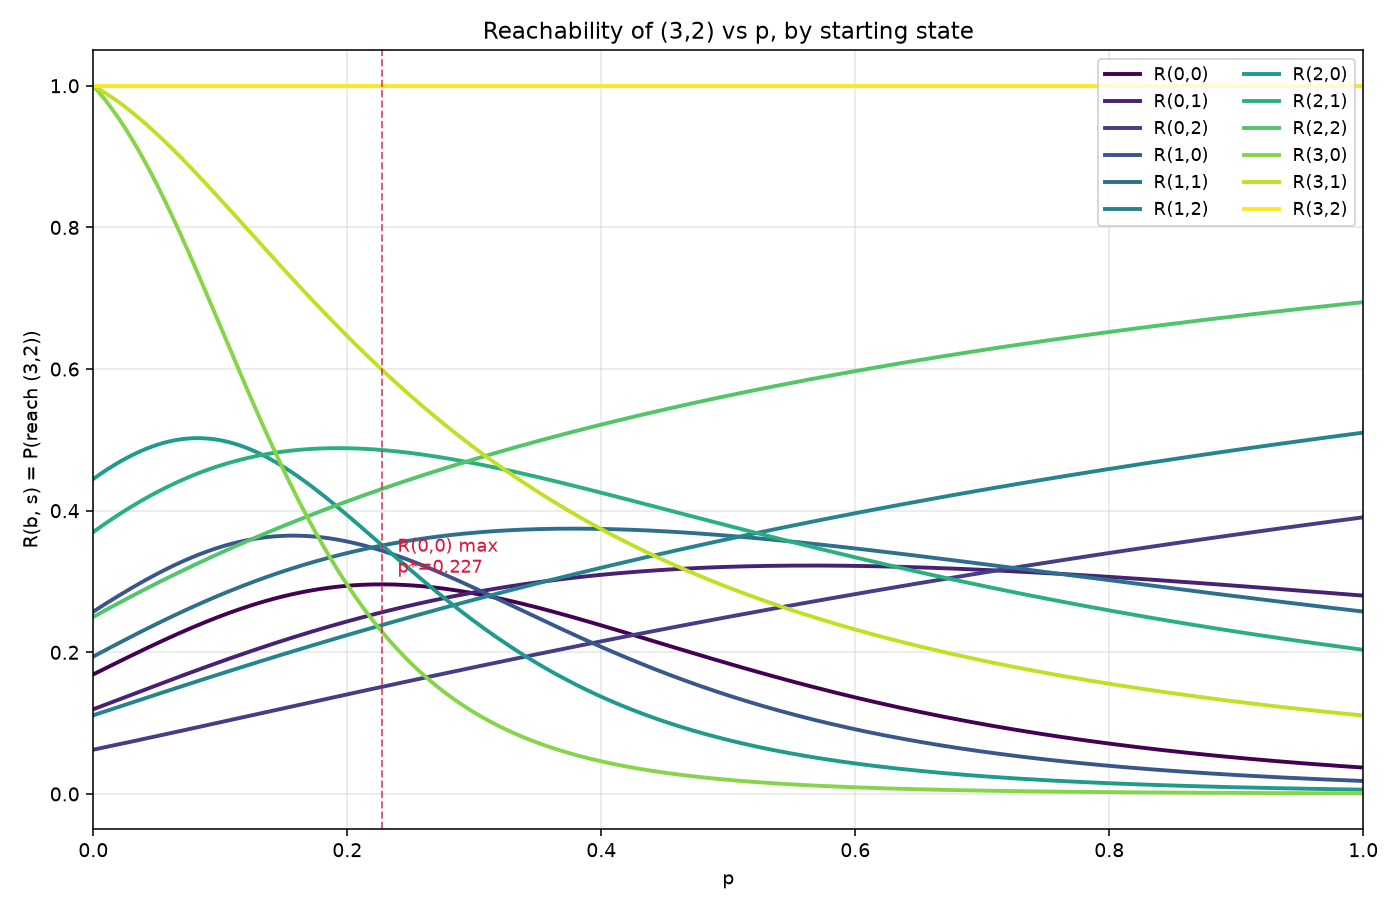
<p>Before we move on to solving, I wanted to show off these curves!</p>

<p><img src="/images/puz2_V.png" alt="Plot of the batter's expected value V(b,s) at each ball-strike count as a function of the hit probability p" /></p>

<p><img src="/images/puz2_R.png" alt="Plot of R(b,s), the probability of reaching a full count from each game state, as a function of the hit probability p, showing a single clear maximum for R(0,0)" /></p>

<p>Look at that clean maximum for \(R(0,0)\)!</p>

<h2 id="black-box-search-and-solving-the-puzzle">Black Box Search and Solving the Puzzle</h2>

<p>Now we can calculate \(R(0,0)\) quickly for any value of \(p\) and can see in the plot above that \(R(0,0)\) has a clear single maximum in \([0,1]\). We can adapt Descartes’ Rule of Signs to rigorously prove that \(R(0,0)\) has a single maximum in \([0,1]\), but I will skip that.</p>

<p>Let’s calculate \(\operatorname*{arg\,max}\limits_{p \in [0,1]}\ R(0,0)\).</p>

<p>We will use <a href="https://en.wikipedia.org/wiki/Golden-section_search">golden section search</a>, a blackbox (derivative free) optimization technique, because maximizing \(R(0,0)\) would involve computing the derivative of an insane rational polynomial in \(p\), which would cause a slew of precision issues that we don’t need to deal with.</p>

<p>This runs in less than a second. Here are our solutions to 10 decimal places:</p>

\[\operatorname*{arg\,max}\limits_{p \in [0,1]}\ R(0,0) = 0.2269732325\]

\[\operatorname*{max}\limits_{p \in [0,1]}\ R(0,0) = 0.2959679934\]

<p>Here is the search’s trace, in case you’re curious.</p>

<table>
  <thead>
    <tr>
      <th>N Evals</th>
      <th>Lower Bound</th>
      <th>Upper Bound</th>
      <th>Best Guess max of R(0,0)</th>
    </tr>
  </thead>
  <tbody>
    <tr>
      <td>0</td>
      <td>0.000000000000</td>
      <td>1.000000000000</td>
      <td>0.247428935807</td>
    </tr>
    <tr>
      <td>3</td>
      <td>0.000000000000</td>
      <td>0.618033988750</td>
      <td>0.295748501269</td>
    </tr>
    <tr>
      <td>4</td>
      <td>0.000000000000</td>
      <td>0.381966011250</td>
      <td>0.295748501269</td>
    </tr>
    <tr>
      <td>5</td>
      <td>0.145898033750</td>
      <td>0.381966011250</td>
      <td>0.295748501269</td>
    </tr>
    <tr>
      <td>6</td>
      <td>0.145898033750</td>
      <td>0.291796067501</td>
      <td>0.295748501269</td>
    </tr>
    <tr>
      <td>7</td>
      <td>0.201626123751</td>
      <td>0.291796067501</td>
      <td>0.295748501269</td>
    </tr>
    <tr>
      <td>8</td>
      <td>0.201626123751</td>
      <td>0.257354213752</td>
      <td>0.295923558506</td>
    </tr>
    <tr>
      <td>9</td>
      <td>0.201626123751</td>
      <td>0.236067977500</td>
      <td>0.295923558506</td>
    </tr>
    <tr>
      <td>10</td>
      <td>0.214781741248</td>
      <td>0.236067977500</td>
      <td>0.295965502715</td>
    </tr>
    <tr>
      <td>11</td>
      <td>0.222912360003</td>
      <td>0.236067977500</td>
      <td>0.295965502715</td>
    </tr>
    <tr>
      <td>12</td>
      <td>0.222912360003</td>
      <td>0.231042978759</td>
      <td>0.295965543018</td>
    </tr>
    <tr>
      <td>13</td>
      <td>0.222912360003</td>
      <td>0.227937358744</td>
      <td>0.295965543018</td>
    </tr>
    <tr>
      <td>14</td>
      <td>0.224831738729</td>
      <td>0.227937358744</td>
      <td>0.295967861004</td>
    </tr>
    <tr>
      <td>15</td>
      <td>0.226017980019</td>
      <td>0.227937358744</td>
      <td>0.295967861004</td>
    </tr>
    <tr>
      <td>16</td>
      <td>0.226017980019</td>
      <td>0.227204221308</td>
      <td>0.295967861004</td>
    </tr>
    <tr>
      <td>17</td>
      <td>0.226471083872</td>
      <td>0.227204221308</td>
      <td>0.295967986922</td>
    </tr>
    <tr>
      <td>18</td>
      <td>0.226751117454</td>
      <td>0.227204221308</td>
      <td>0.295967986922</td>
    </tr>
    <tr>
      <td>19</td>
      <td>0.226751117454</td>
      <td>0.227031151036</td>
      <td>0.295967986922</td>
    </tr>
    <tr>
      <td>20</td>
      <td>0.226858080765</td>
      <td>0.227031151036</td>
      <td>0.295967993194</td>
    </tr>
    <tr>
      <td>21</td>
      <td>0.226924187726</td>
      <td>0.227031151036</td>
      <td>0.295967993194</td>
    </tr>
    <tr>
      <td>22</td>
      <td>0.226924187726</td>
      <td>0.226990294687</td>
      <td>0.295967993194</td>
    </tr>
    <tr>
      <td>23</td>
      <td>0.226949438338</td>
      <td>0.226990294687</td>
      <td>0.295967993369</td>
    </tr>
    <tr>
      <td>24</td>
      <td>0.226965044075</td>
      <td>0.226990294687</td>
      <td>0.295967993369</td>
    </tr>
    <tr>
      <td>25</td>
      <td>0.226965044075</td>
      <td>0.226980649812</td>
      <td>0.295967993369</td>
    </tr>
    <tr>
      <td>26</td>
      <td>0.226971004936</td>
      <td>0.226980649812</td>
      <td>0.295967993369</td>
    </tr>
    <tr>
      <td>27</td>
      <td>0.226971004936</td>
      <td>0.226976965797</td>
      <td>0.295967993374</td>
    </tr>
    <tr>
      <td>28</td>
      <td>0.226971004936</td>
      <td>0.226974688951</td>
      <td>0.295967993374</td>
    </tr>
    <tr>
      <td>29</td>
      <td>0.226972412104</td>
      <td>0.226974688951</td>
      <td>0.295967993374</td>
    </tr>
    <tr>
      <td>30</td>
      <td>0.226972412104</td>
      <td>0.226973819273</td>
      <td>0.295967993374</td>
    </tr>
    <tr>
      <td>31</td>
      <td>0.226972949595</td>
      <td>0.226973819273</td>
      <td>0.295967993374</td>
    </tr>
    <tr>
      <td>32</td>
      <td>0.226972949595</td>
      <td>0.226973487085</td>
      <td>0.295967993374</td>
    </tr>
    <tr>
      <td>33</td>
      <td>0.226973154898</td>
      <td>0.226973487085</td>
      <td>0.295967993374</td>
    </tr>
    <tr>
      <td>34</td>
      <td>0.226973154898</td>
      <td>0.226973360201</td>
      <td>0.295967993374</td>
    </tr>
    <tr>
      <td>35</td>
      <td>0.226973154898</td>
      <td>0.226973281782</td>
      <td>0.295967993374</td>
    </tr>
    <tr>
      <td>36</td>
      <td>0.226973203364</td>
      <td>0.226973281782</td>
      <td>0.295967993374</td>
    </tr>
    <tr>
      <td>37</td>
      <td>0.226973203364</td>
      <td>0.226973251829</td>
      <td>0.295967993374</td>
    </tr>
    <tr>
      <td>38</td>
      <td>0.226973221876</td>
      <td>0.226973251829</td>
      <td>0.295967993374</td>
    </tr>
    <tr>
      <td>39</td>
      <td>0.226973221876</td>
      <td>0.226973240388</td>
      <td>0.295967993374</td>
    </tr>
    <tr>
      <td>40</td>
      <td>0.226973228947</td>
      <td>0.226973240388</td>
      <td>0.295967993374</td>
    </tr>
    <tr>
      <td>41</td>
      <td>0.226973228947</td>
      <td>0.226973236018</td>
      <td>0.295967993374</td>
    </tr>
    <tr>
      <td>42</td>
      <td>0.226973231648</td>
      <td>0.226973236018</td>
      <td>0.295967993374</td>
    </tr>
    <tr>
      <td>43</td>
      <td>0.226973231648</td>
      <td>0.226973234349</td>
      <td>0.295967993374</td>
    </tr>
    <tr>
      <td>44</td>
      <td>0.226973231648</td>
      <td>0.226973233317</td>
      <td>0.295967993374</td>
    </tr>
    <tr>
      <td>45</td>
      <td>0.226973232285</td>
      <td>0.226973233317</td>
      <td>0.295967993374</td>
    </tr>
    <tr>
      <td>46</td>
      <td>0.226973232285</td>
      <td>0.226973232923</td>
      <td>0.295967993374</td>
    </tr>
    <tr>
      <td>47</td>
      <td>0.226973232285</td>
      <td>0.226973232679</td>
      <td>0.295967993374</td>
    </tr>
    <tr>
      <td>48</td>
      <td>0.226973232436</td>
      <td>0.226973232679</td>
      <td>0.295967993374</td>
    </tr>
    <tr>
      <td>49</td>
      <td>0.226973232436</td>
      <td>0.226973232586</td>
      <td>0.295967993374</td>
    </tr>
    <tr>
      <td>50</td>
      <td>0.226973232493</td>
      <td>0.226973232586</td>
      <td>0.295967993374</td>
    </tr>
    <tr>
      <td>51</td>
      <td>0.226973232493</td>
      <td>0.226973232551</td>
      <td>0.295967993374</td>
    </tr>
    <tr>
      <td>52</td>
      <td>0.226973232515</td>
      <td>0.226973232551</td>
      <td>0.295967993374</td>
    </tr>
    <tr>
      <td>53</td>
      <td>0.226973232529</td>
      <td>0.226973232551</td>
      <td>0.295967993374</td>
    </tr>
    <tr>
      <td>54</td>
      <td>0.226973232529</td>
      <td>0.226973232542</td>
      <td>0.295967993374</td>
    </tr>
  </tbody>
</table>]]></content><author><name>Matthew Ritch</name></author><category term="blog" /><category term="game theory" /><category term="probability" /><category term="puzzles" /><summary type="html"><![CDATA[Solving Jane Street's Robot Baseball puzzle with Markov game analysis and golden section search, an enjoyable mix of symbolic math and numerical methods.]]></summary><media:thumbnail xmlns:media="http://search.yahoo.com/mrss/" url="https://matthewritch.com/images/puz2_R.png" /><media:content medium="image" url="https://matthewritch.com/images/puz2_R.png" xmlns:media="http://search.yahoo.com/mrss/" /></entry><entry><title type="html">Hybrid dApps Part 1: Implementing Sign-In with Ethereum in Django</title><link href="https://matthewritch.com/blog/2025/10/04/Ethereum-SIWE-Django/" rel="alternate" type="text/html" title="Hybrid dApps Part 1: Implementing Sign-In with Ethereum in Django" /><published>2025-10-04T17:00:00-04:00</published><updated>2025-10-04T17:00:00-04:00</updated><id>https://matthewritch.com/blog/2025/10/04/Ethereum-SIWE-Django</id><content type="html" xml:base="https://matthewritch.com/blog/2025/10/04/Ethereum-SIWE-Django/"><![CDATA[<ul id="markdown-toc">
  <li><a href="#what-is-siwe" id="markdown-toc-what-is-siwe">What is SIWE?</a>    <ul>
      <li><a href="#the-siwe-method" id="markdown-toc-the-siwe-method">The SIWE Method</a></li>
      <li><a href="#an-example-siwe-message" id="markdown-toc-an-example-siwe-message">An Example SIWE Message</a></li>
    </ul>
  </li>
  <li><a href="#why-would-you-use-siwe-with-django" id="markdown-toc-why-would-you-use-siwe-with-django">Why would you use SIWE with Django?</a></li>
  <li><a href="#implementing-siwe-in-django" id="markdown-toc-implementing-siwe-in-django">Implementing SIWE in Django</a>    <ul>
      <li><a href="#the-siweuser-model" id="markdown-toc-the-siweuser-model">The SiweUser Model</a></li>
      <li><a href="#siwe-verification-and-authentication" id="markdown-toc-siwe-verification-and-authentication">SIWE Verification and Authentication</a>        <ul>
          <li><a href="#siwe-verification" id="markdown-toc-siwe-verification">SIWE Verification</a></li>
          <li><a href="#siwe-authentication" id="markdown-toc-siwe-authentication">SIWE Authentication</a></li>
        </ul>
      </li>
      <li><a href="#siwe-views" id="markdown-toc-siwe-views">SIWE Views</a></li>
      <li><a href="#testing-your-implementation" id="markdown-toc-testing-your-implementation">Testing your implementation</a></li>
    </ul>
  </li>
  <li><a href="#conclusion" id="markdown-toc-conclusion">Conclusion</a></li>
</ul>

<h2 id="what-is-siwe">What is SIWE?</h2>

<p><a href="https://docs.login.xyz/">Sign-in With Ethereum</a> (SIWE) is a method for using Ethereum addresses to authenticate on off-chain services. Implementing SIWE means that your users don’t need to create a separate account on your website as long as they already have an address on Ethereum or any other EVM-compatible chain.</p>

<p>SIWE allows authentication on decentralized apps (dApps), where users must already have an address to transact. Authenticating with that address saves them from needing to manage separate login info.</p>

<h3 id="the-siwe-method">The SIWE Method</h3>

<p>SIWE relies on the same public-key cryptography that addresses use to transact on EVM chains. In brief:</p>

<ol>
  <li>The server sends a cryptographic nonce to the client. This nonce is just a one-time-use randomly generated string. This nonce will be included in the message in the next step to prevent replay attacks, where an attacker would record a user’s signed SIWE message and attempt to authenticate as that user by sending your server the same signed message.</li>
  <li>The server sends a message to the client for signing. That message attests at least these fields:
    <ul>
      <li>The user’s address</li>
      <li>The domain requesting the SIWE</li>
      <li>SIWE message version</li>
      <li>The EVM chain id that your site uses</li>
      <li>The URI of the resource that will validate the SIWE message and authenticate the user</li>
      <li>The nonce from step 1</li>
      <li>The time that the message was issued</li>
    </ul>
  </li>
  <li>The user signs the SIWE message with their private key and sends it to the site’s login endpoint along with their address.</li>
  <li>The server checks the signature to make sure that the true owner of the address sent the signed SIWE message. The server also verifies the message’s fields.</li>
</ol>

<h3 id="an-example-siwe-message">An Example SIWE Message</h3>

<div class="language-plaintext highlighter-rouge"><div class="highlight"><pre class="highlight"><code>your-dapp.xyz wants you to sign in with your Ethereum Address:
0x105d00D5f671B236AfED1D2EEF5D7d566382E8C3

URI: your-dapp.xyz/login
Message Version: 2.1
Chain ID: 1
Nonce: 92649128
Issued At: 2025-10-04T17:00:00Z
</code></pre></div></div>

<h2 id="why-would-you-use-siwe-with-django">Why would you use SIWE with Django?</h2>

<p>Django is a commonly used Python web framework. It provides abstractions that allow you to easily create database models, set up CRUD and more complicated endpoints, and handle user permissions.</p>

<p>OK, so Django is a conventional web framework. But SIWE is mostly for dApps, right? Why use it with Django? Well, dApps store data on blockchains, but you may want to store some user or app data off-chain to:</p>

<p>1) Save gas on storage space
2) Store data types like videos that have poor support on blockchains
3) Reduce latency</p>

<p>If you want to create a hybrid dApp that also stores data on a centralized server, Django is a good choice because of its rapid development, ease of maintenance, and good scalability. Here are some specific hybrid dApp use cases:</p>
<ul>
  <li>You want to allow users to customize their dApp UI and save those customizations between sessions without storing that info on-chain</li>
  <li>Your dApp stores compressed attestations of data on the chain to save gas, so you need a conventional backend to store full-size records</li>
  <li>You want users to view their transaction history without waiting for a long and complicated blockchain query</li>
</ul>

<p>So, to create a hybrid Django dApp, you will likely want to implement SIWE in Django.</p>

<h2 id="implementing-siwe-in-django">Implementing SIWE in Django</h2>

<p>Your SIWE implementation will need three key components:</p>

<p>1) A SiweUser model that extends the base Django user model with an Ethereum address field
2) SIWE verification logic and an authentication backend
3) A SIWE login view</p>

<p>Let’s put these components into their own django app within your project.</p>

<div class="language-bash highlighter-rouge"><div class="highlight"><pre class="highlight"><code>python manage.py startapp siweauth
</code></pre></div></div>

<p>I did this for a project earlier this year, so you can also check out my implementation <a href="https://github.com/matthew-ritch/facthound/tree/main/siweauth">here</a>. Note that I used JWTs instead of Django’s built-in session framework, so there will be some differences in how you manage user sessions.</p>

<h3 id="the-siweuser-model">The SiweUser Model</h3>

<p>Django’s base user model has almost everything you need for basic auth and user management. We just need to add a field for the user’s Ethereum address and a manager method to create users with just an address.</p>

<p>We will also need a model for the SIWE message’s nonce. This nonce should be single-use and have an expiration time.</p>

<div class="language-python highlighter-rouge"><div class="highlight"><pre class="highlight"><code><span class="c1"># siweauth/models.py
</span><span class="s">"""
Database models for SIWE
"""</span>

<span class="kn">from</span> <span class="nn">django.db</span> <span class="kn">import</span> <span class="n">models</span>
<span class="kn">from</span> <span class="nn">django.core.validators</span> <span class="kn">import</span> <span class="n">RegexValidator</span>
<span class="kn">from</span> <span class="nn">django.core.exceptions</span> <span class="kn">import</span> <span class="n">ValidationError</span>
<span class="kn">from</span> <span class="nn">django.contrib.auth.models</span> <span class="kn">import</span> <span class="n">BaseUserManager</span><span class="p">,</span> <span class="n">AbstractBaseUser</span>
<span class="kn">from</span> <span class="nn">web3</span> <span class="kn">import</span> <span class="n">Web3</span>


<span class="k">def</span> <span class="nf">validate_ethereum_address</span><span class="p">(</span><span class="n">value</span><span class="p">):</span>
    <span class="s">"""
    Validate that an Ethereum address is correctly checksummed.
    
    Args:
        value: The Ethereum address to validate
        
    Raises:
        ValidationError: If the address is not a valid checksummed Ethereum address
    """</span>
    <span class="k">if</span> <span class="ow">not</span> <span class="n">Web3</span><span class="p">.</span><span class="n">isChecksumAddress</span><span class="p">(</span><span class="n">value</span><span class="p">):</span>
        <span class="k">raise</span> <span class="n">ValidationError</span>


<span class="k">class</span> <span class="nc">Nonce</span><span class="p">(</span><span class="n">models</span><span class="p">.</span><span class="n">Model</span><span class="p">):</span>
    <span class="s">"""
    A temporary nonce used for SIWE authentication.
    
    Nonces are single-use random values that prevent replay attacks during
    authentication and have expiration times.
    """</span>
    <span class="n">value</span> <span class="o">=</span> <span class="n">models</span><span class="p">.</span><span class="n">CharField</span><span class="p">(</span><span class="n">max_length</span><span class="o">=</span><span class="mi">24</span><span class="p">,</span> <span class="n">primary_key</span><span class="o">=</span><span class="bp">True</span><span class="p">)</span>
    <span class="n">expiration</span> <span class="o">=</span> <span class="n">models</span><span class="p">.</span><span class="n">DateTimeField</span><span class="p">()</span>

    <span class="k">def</span> <span class="nf">__str__</span><span class="p">(</span><span class="bp">self</span><span class="p">):</span>
        <span class="k">return</span> <span class="bp">self</span><span class="p">.</span><span class="n">value</span>


<span class="k">class</span> <span class="nc">SiweUserManager</span><span class="p">(</span><span class="n">BaseUserManager</span><span class="p">):</span>
    <span class="s">"""
    Manager for the custom SiweUser model.
    
    This manager provides methods for creating users authenticated via SIWE
    """</span>
    <span class="k">def</span> <span class="nf">create_user_address</span><span class="p">(</span><span class="bp">self</span><span class="p">,</span> <span class="n">address</span><span class="p">):</span>
        <span class="s">"""
        Create and save a SiweUser with the given Ethereum address.
        
        Args:   
            address: The Ethereum wallet address
            
        Returns:
            SiweUser: The created user instance
            
        Raises:
            ValueError: If no address is provided
        """</span>
        <span class="k">if</span> <span class="ow">not</span> <span class="n">address</span><span class="p">:</span>
            <span class="k">raise</span> <span class="nb">ValueError</span><span class="p">(</span><span class="s">"SiweUsers must have an eth address"</span><span class="p">)</span>
        <span class="n">validate_ethereum_address</span><span class="p">(</span><span class="n">address</span><span class="p">)</span>
        <span class="n">user</span> <span class="o">=</span> <span class="bp">self</span><span class="p">.</span><span class="n">model</span><span class="p">(</span>
            <span class="n">wallet</span><span class="o">=</span><span class="n">address</span><span class="p">,</span>
        <span class="p">)</span>
        <span class="n">user</span><span class="p">.</span><span class="n">save</span><span class="p">(</span><span class="n">using</span><span class="o">=</span><span class="bp">self</span><span class="p">.</span><span class="n">_db</span><span class="p">)</span>
        <span class="k">return</span> <span class="n">user</span>


<span class="k">class</span> <span class="nc">SiweUser</span><span class="p">(</span><span class="n">AbstractBaseUser</span><span class="p">):</span>
    <span class="s">"""
    This model extends AbstractBaseUser to support authentication via SIWE.
    """</span>
    <span class="n">wallet</span> <span class="o">=</span> <span class="n">models</span><span class="p">.</span><span class="n">CharField</span><span class="p">(</span>
        <span class="n">verbose_name</span><span class="o">=</span><span class="s">"Wallet Address"</span><span class="p">,</span>
        <span class="n">max_length</span><span class="o">=</span><span class="mi">42</span><span class="p">,</span>
        <span class="n">unique</span><span class="o">=</span><span class="bp">True</span><span class="p">,</span>
        <span class="n">primary_key</span><span class="o">=</span><span class="bp">True</span><span class="p">,</span>
        <span class="n">validators</span><span class="o">=</span><span class="p">[</span>
            <span class="n">RegexValidator</span><span class="p">(</span><span class="n">regex</span><span class="o">=</span><span class="sa">r</span><span class="s">"^0x[a-fA-F0-9]{40}$"</span><span class="p">),</span>
            <span class="n">validate_ethereum_address</span><span class="p">,</span>
        <span class="p">],</span>
    <span class="p">)</span>
    <span class="n">username</span> <span class="o">=</span> <span class="n">models</span><span class="p">.</span><span class="n">CharField</span><span class="p">(</span><span class="n">max_length</span><span class="o">=</span><span class="mi">150</span><span class="p">,</span> <span class="n">blank</span><span class="o">=</span><span class="bp">True</span><span class="p">,</span> <span class="n">null</span><span class="o">=</span><span class="bp">True</span><span class="p">,</span> <span class="n">unique</span><span class="o">=</span><span class="bp">True</span><span class="p">)</span>
    <span class="n">email</span> <span class="o">=</span> <span class="n">models</span><span class="p">.</span><span class="n">CharField</span><span class="p">(</span><span class="n">max_length</span><span class="o">=</span><span class="mi">150</span><span class="p">,</span> <span class="n">blank</span><span class="o">=</span><span class="bp">True</span><span class="p">,</span> <span class="n">null</span><span class="o">=</span><span class="bp">True</span><span class="p">,</span> <span class="n">unique</span><span class="o">=</span><span class="bp">True</span><span class="p">)</span>
    <span class="n">is_admin</span> <span class="o">=</span> <span class="n">models</span><span class="p">.</span><span class="n">BooleanField</span><span class="p">(</span><span class="n">default</span><span class="o">=</span><span class="bp">False</span><span class="p">)</span>
    <span class="n">is_staff</span> <span class="o">=</span> <span class="n">models</span><span class="p">.</span><span class="n">BooleanField</span><span class="p">(</span><span class="n">default</span><span class="o">=</span><span class="bp">False</span><span class="p">)</span>
    <span class="n">password</span> <span class="o">=</span> <span class="n">models</span><span class="p">.</span><span class="n">CharField</span><span class="p">(</span><span class="n">max_length</span><span class="o">=</span><span class="mi">128</span><span class="p">,</span> <span class="n">blank</span><span class="o">=</span><span class="bp">True</span><span class="p">)</span>
    <span class="n">objects</span> <span class="o">=</span> <span class="n">SiweUserManager</span><span class="p">()</span>

    <span class="n">USERNAME_FIELD</span> <span class="o">=</span> <span class="s">"wallet"</span>
    <span class="n">REQUIRED_FIELDS</span> <span class="o">=</span> <span class="p">[]</span>

    <span class="k">def</span> <span class="nf">__str__</span><span class="p">(</span><span class="bp">self</span><span class="p">):</span>
        <span class="k">return</span> <span class="bp">self</span><span class="p">.</span><span class="n">wallet</span>

    <span class="o">@</span><span class="nb">property</span>
    <span class="k">def</span> <span class="nf">is_superuser</span><span class="p">(</span><span class="bp">self</span><span class="p">):</span>
        <span class="k">return</span> <span class="bp">self</span><span class="p">.</span><span class="n">is_admin</span>

    <span class="k">def</span> <span class="nf">has_perm</span><span class="p">(</span><span class="bp">self</span><span class="p">,</span> <span class="n">perm</span><span class="p">,</span> <span class="n">obj</span><span class="o">=</span><span class="bp">None</span><span class="p">):</span>
        <span class="k">return</span> <span class="bp">self</span><span class="p">.</span><span class="n">is_admin</span>

    <span class="k">def</span> <span class="nf">has_module_perms</span><span class="p">(</span><span class="bp">self</span><span class="p">,</span> <span class="n">app_label</span><span class="p">):</span>
        <span class="k">return</span> <span class="bp">self</span><span class="p">.</span><span class="n">is_admin</span>
</code></pre></div></div>

<p>Now, register the custom user model in your settings.py file.</p>

<div class="language-python highlighter-rouge"><div class="highlight"><pre class="highlight"><code><span class="c1"># your_project/settings.py
</span><span class="p">...</span>
<span class="n">AUTH_USER_MODEL</span> <span class="o">=</span> <span class="s">"siweauth.SiweUser"</span>
<span class="p">...</span>
</code></pre></div></div>

<h3 id="siwe-verification-and-authentication">SIWE Verification and Authentication</h3>

<p>We will write custom authentication methods to verify SIWE methods and allow authentication by Ethereum address.</p>

<h4 id="siwe-verification">SIWE Verification</h4>

<p>First, let’s create some settings for those SIWE message fields. Our validation will check that the messages’ fields match these expected values. These settings are hardcoded so you can see them, but you should set yours in environment variables for security.</p>

<div class="language-python highlighter-rouge"><div class="highlight"><pre class="highlight"><code><span class="c1"># your_project/settings.py
</span><span class="p">...</span>
<span class="c1"># SIWE message validity window in minutes
</span><span class="n">SIWE_MESSAGE_VALIDITY</span> <span class="o">=</span> <span class="mi">5</span>  <span class="c1"># 5 minutes
# Expected chain ID for SIWE messages
</span><span class="n">SIWE_CHAIN_ID</span> <span class="o">=</span> <span class="mi">11155111</span> <span class="c1"># Ethereum sepolia testnet
# Expected domain for SIWE messages
</span><span class="n">SIWE_DOMAIN</span> <span class="o">=</span> <span class="s">"your-dapp.xyz"</span>
<span class="c1"># Expected URI for SIWE messages
</span><span class="n">SIWE_URI</span> <span class="o">=</span> <span class="s">"https://your-dapp.xyz/login"</span>
<span class="p">...</span>
</code></pre></div></div>

<p>Now, we need to write some functions to verify SIWE messages using those settings.</p>
<ul>
  <li><code class="language-plaintext highlighter-rouge">_nonce_is_valid</code> ensures that our SIWE messages’ nonces are valid.</li>
  <li><code class="language-plaintext highlighter-rouge">parse_siwe_message</code> splits our plaintext SIWE messages into fields for validation.</li>
  <li><code class="language-plaintext highlighter-rouge">check_siwe</code> validates those fields.</li>
</ul>

<div class="language-python highlighter-rouge"><div class="highlight"><pre class="highlight"><code><span class="c1"># siweauth/auth.py
</span><span class="kn">import</span> <span class="nn">datetime</span><span class="p">,</span> <span class="n">pytz</span>
<span class="kn">from</span> <span class="nn">web3</span> <span class="kn">import</span> <span class="n">Web3</span>
<span class="kn">from</span> <span class="nn">hexbytes</span> <span class="kn">import</span> <span class="n">HexBytes</span>
<span class="kn">from</span> <span class="nn">eth_account.messages</span> <span class="kn">import</span> <span class="n">encode_defunct</span>
<span class="kn">import</span> <span class="nn">re</span>
<span class="kn">from</span> <span class="nn">your_project.settings</span> <span class="kn">import</span> <span class="p">(</span>
    <span class="n">SIWE_MESSAGE_VALIDITY</span><span class="p">,</span>
    <span class="n">SIWE_CHAIN_ID</span><span class="p">,</span>
    <span class="n">SIWE_DOMAIN</span><span class="p">,</span>
    <span class="n">SIWE_URI</span><span class="p">,</span>
<span class="p">)</span>
<span class="kn">from</span> <span class="nn">siweauth.models</span> <span class="kn">import</span> <span class="n">Nonce</span>

<span class="n">w3</span> <span class="o">=</span> <span class="n">Web3</span><span class="p">()</span>


<span class="k">def</span> <span class="nf">_nonce_is_valid</span><span class="p">(</span><span class="n">nonce</span><span class="p">:</span> <span class="nb">str</span><span class="p">)</span> <span class="o">-&gt;</span> <span class="nb">bool</span><span class="p">:</span>
    <span class="s">"""
    Check if given nonce exists and has not yet expired.
    :param nonce: The nonce string to validate.
    :return: True if valid else False.
    """</span>
    <span class="n">n</span> <span class="o">=</span> <span class="n">Nonce</span><span class="p">.</span><span class="n">objects</span><span class="p">.</span><span class="nb">filter</span><span class="p">(</span><span class="n">value</span><span class="o">=</span><span class="n">nonce</span><span class="p">).</span><span class="n">first</span><span class="p">()</span>
    <span class="n">is_valid</span> <span class="o">=</span> <span class="bp">False</span>
    <span class="k">if</span> <span class="n">n</span> <span class="ow">is</span> <span class="ow">not</span> <span class="bp">None</span><span class="p">:</span>
        <span class="k">if</span> <span class="n">n</span><span class="p">.</span><span class="n">expiration</span> <span class="o">&gt;</span> <span class="n">datetime</span><span class="p">.</span><span class="n">datetime</span><span class="p">.</span><span class="n">now</span><span class="p">(</span><span class="n">tz</span><span class="o">=</span><span class="n">pytz</span><span class="p">.</span><span class="n">UTC</span><span class="p">):</span>
            <span class="n">is_valid</span> <span class="o">=</span> <span class="bp">True</span>
            <span class="n">n</span><span class="p">.</span><span class="n">delete</span><span class="p">()</span>
    <span class="k">return</span> <span class="n">is_valid</span>


<span class="k">def</span> <span class="nf">parse_siwe_message</span><span class="p">(</span><span class="n">message_body</span><span class="p">:</span> <span class="nb">str</span><span class="p">)</span> <span class="o">-&gt;</span> <span class="nb">dict</span><span class="p">:</span>
    <span class="s">"""
    Parse SIWE message into components.
    Returns a dict or None if parsing fails.
    """</span>
    <span class="k">try</span><span class="p">:</span>
        <span class="n">domain_match</span> <span class="o">=</span> <span class="n">re</span><span class="p">.</span><span class="n">match</span><span class="p">(</span><span class="sa">r</span><span class="s">"^([^\s]+) wants you to sign in with your Ethereum Address:"</span><span class="p">,</span> <span class="n">message_body</span><span class="p">)</span>
        <span class="n">address_match</span> <span class="o">=</span> <span class="n">re</span><span class="p">.</span><span class="n">search</span><span class="p">(</span><span class="sa">r</span><span class="s">"Ethereum Address:\n(0x[a-fA-F0-9]{40})"</span><span class="p">,</span> <span class="n">message_body</span><span class="p">)</span>
        <span class="n">uri_match</span> <span class="o">=</span> <span class="n">re</span><span class="p">.</span><span class="n">search</span><span class="p">(</span><span class="sa">r</span><span class="s">"^URI:\s*(.+)$"</span><span class="p">,</span> <span class="n">message_body</span><span class="p">,</span> <span class="n">re</span><span class="p">.</span><span class="n">MULTILINE</span><span class="p">)</span>
        <span class="n">version_match</span> <span class="o">=</span> <span class="n">re</span><span class="p">.</span><span class="n">search</span><span class="p">(</span><span class="sa">r</span><span class="s">"^Message Version:\s*(.+)$"</span><span class="p">,</span> <span class="n">message_body</span><span class="p">,</span> <span class="n">re</span><span class="p">.</span><span class="n">MULTILINE</span><span class="p">)</span>
        <span class="n">chain_id_match</span> <span class="o">=</span> <span class="n">re</span><span class="p">.</span><span class="n">search</span><span class="p">(</span><span class="sa">r</span><span class="s">"^Chain ID:\s*(\d+)$"</span><span class="p">,</span> <span class="n">message_body</span><span class="p">,</span> <span class="n">re</span><span class="p">.</span><span class="n">MULTILINE</span><span class="p">)</span>
        <span class="n">nonce_match</span> <span class="o">=</span> <span class="n">re</span><span class="p">.</span><span class="n">search</span><span class="p">(</span><span class="sa">r</span><span class="s">"^Nonce:\s*(.+)$"</span><span class="p">,</span> <span class="n">message_body</span><span class="p">,</span> <span class="n">re</span><span class="p">.</span><span class="n">MULTILINE</span><span class="p">)</span>
        <span class="n">issued_at_match</span> <span class="o">=</span> <span class="n">re</span><span class="p">.</span><span class="n">search</span><span class="p">(</span><span class="sa">r</span><span class="s">"^Issued At:\s*(.+)$"</span><span class="p">,</span> <span class="n">message_body</span><span class="p">,</span> <span class="n">re</span><span class="p">.</span><span class="n">MULTILINE</span><span class="p">)</span>

        <span class="k">if</span> <span class="ow">not</span> <span class="p">(</span><span class="n">domain_match</span> <span class="ow">and</span> <span class="n">address_match</span> <span class="ow">and</span> <span class="n">uri_match</span> <span class="ow">and</span> <span class="n">version_match</span> <span class="ow">and</span> <span class="n">chain_id_match</span> <span class="ow">and</span> <span class="n">nonce_match</span> <span class="ow">and</span> <span class="n">issued_at_match</span><span class="p">):</span>
            <span class="k">return</span> <span class="bp">None</span>

        <span class="n">domain</span> <span class="o">=</span> <span class="n">domain_match</span><span class="p">.</span><span class="n">group</span><span class="p">(</span><span class="mi">1</span><span class="p">).</span><span class="n">strip</span><span class="p">()</span>
        <span class="n">address</span> <span class="o">=</span> <span class="n">address_match</span><span class="p">.</span><span class="n">group</span><span class="p">(</span><span class="mi">1</span><span class="p">).</span><span class="n">strip</span><span class="p">()</span>
        <span class="n">uri</span> <span class="o">=</span> <span class="n">uri_match</span><span class="p">.</span><span class="n">group</span><span class="p">(</span><span class="mi">1</span><span class="p">).</span><span class="n">strip</span><span class="p">()</span>
        <span class="n">version</span> <span class="o">=</span> <span class="n">version_match</span><span class="p">.</span><span class="n">group</span><span class="p">(</span><span class="mi">1</span><span class="p">).</span><span class="n">strip</span><span class="p">()</span>
        <span class="n">chain_id</span> <span class="o">=</span> <span class="nb">int</span><span class="p">(</span><span class="n">chain_id_match</span><span class="p">.</span><span class="n">group</span><span class="p">(</span><span class="mi">1</span><span class="p">))</span>
        <span class="n">nonce</span> <span class="o">=</span> <span class="n">nonce_match</span><span class="p">.</span><span class="n">group</span><span class="p">(</span><span class="mi">1</span><span class="p">).</span><span class="n">strip</span><span class="p">()</span>
        <span class="n">issued_at</span> <span class="o">=</span> <span class="n">datetime</span><span class="p">.</span><span class="n">fromisoformat</span><span class="p">(</span><span class="n">issued_at_match</span><span class="p">.</span><span class="n">group</span><span class="p">(</span><span class="mi">1</span><span class="p">).</span><span class="n">strip</span><span class="p">())</span>

        <span class="k">return</span> <span class="p">{</span>
            <span class="s">"domain"</span><span class="p">:</span> <span class="n">domain</span><span class="p">,</span>
            <span class="s">"address"</span><span class="p">:</span> <span class="n">address</span><span class="p">,</span>
            <span class="s">"uri"</span><span class="p">:</span> <span class="n">uri</span><span class="p">,</span>
            <span class="s">"version"</span><span class="p">:</span> <span class="n">version</span><span class="p">,</span>
            <span class="s">"chain_id"</span><span class="p">:</span> <span class="n">chain_id</span><span class="p">,</span>
            <span class="s">"nonce"</span><span class="p">:</span> <span class="n">nonce</span><span class="p">,</span>
            <span class="s">"issued_at"</span><span class="p">:</span> <span class="n">issued_at</span><span class="p">,</span>
        <span class="p">}</span>
    <span class="k">except</span> <span class="nb">Exception</span> <span class="k">as</span> <span class="n">e</span><span class="p">:</span>
        <span class="c1"># Optionally log the error here
</span>        <span class="k">return</span> <span class="bp">None</span>


<span class="k">def</span> <span class="nf">check_siwe</span><span class="p">(</span><span class="n">message</span><span class="p">,</span> <span class="n">signed_message</span><span class="p">):</span>
    <span class="c1"># check for format
</span>    <span class="k">if</span> <span class="nb">type</span><span class="p">(</span><span class="n">message</span><span class="p">)</span> <span class="o">!=</span> <span class="nb">str</span><span class="p">:</span>
        <span class="n">body</span> <span class="o">=</span> <span class="nb">str</span><span class="p">(</span><span class="n">message</span><span class="p">.</span><span class="n">decode</span><span class="p">())</span>
    <span class="k">else</span><span class="p">:</span>
        <span class="n">body</span> <span class="o">=</span> <span class="n">message</span>
    <span class="c1"># Parse message components
</span>    <span class="n">parsed</span> <span class="o">=</span> <span class="n">parse_siwe_message</span><span class="p">(</span><span class="n">body</span><span class="p">)</span>
    <span class="k">if</span> <span class="ow">not</span> <span class="n">parsed</span><span class="p">:</span>
        <span class="k">return</span> <span class="bp">None</span>
    <span class="c1"># Validate timestamp
</span>    <span class="n">now</span> <span class="o">=</span> <span class="n">datetime</span><span class="p">.</span><span class="n">now</span><span class="p">(</span><span class="n">parsed</span><span class="p">[</span><span class="s">"issued_at"</span><span class="p">].</span><span class="n">tzinfo</span><span class="p">)</span>
    <span class="k">if</span> <span class="nb">abs</span><span class="p">((</span><span class="n">now</span> <span class="o">-</span> <span class="n">parsed</span><span class="p">[</span><span class="s">"issued_at"</span><span class="p">]).</span><span class="n">total_seconds</span><span class="p">())</span> <span class="o">&gt;</span> <span class="n">SIWE_MESSAGE_VALIDITY</span> <span class="o">*</span> <span class="mi">60</span><span class="p">:</span>
        <span class="k">return</span> <span class="bp">None</span>

    <span class="c1"># Validate chain ID
</span>    <span class="k">if</span> <span class="n">parsed</span><span class="p">[</span><span class="s">"chain_id"</span><span class="p">]</span> <span class="o">!=</span> <span class="n">SIWE_CHAIN_ID</span><span class="p">:</span>
        <span class="k">return</span> <span class="bp">None</span>

    <span class="c1"># Validate domain and URI
</span>    <span class="k">if</span> <span class="n">parsed</span><span class="p">[</span><span class="s">"domain"</span><span class="p">]</span> <span class="o">!=</span> <span class="n">SIWE_DOMAIN</span> <span class="ow">or</span> <span class="n">parsed</span><span class="p">[</span><span class="s">"uri"</span><span class="p">]</span> <span class="o">!=</span> <span class="n">SIWE_URI</span><span class="p">:</span>
        <span class="k">return</span> <span class="bp">None</span>

    <span class="c1"># check for nonce in db
</span>    <span class="k">if</span> <span class="ow">not</span> <span class="n">_nonce_is_valid</span><span class="p">(</span><span class="n">parsed</span><span class="p">[</span><span class="s">"nonce"</span><span class="p">]):</span>
        <span class="k">return</span> <span class="bp">None</span>
    <span class="c1"># recover address from nonce / signed message
</span>    <span class="n">address</span> <span class="o">=</span> <span class="n">parsed</span><span class="p">[</span><span class="s">"address"</span><span class="p">]</span>
    <span class="k">try</span><span class="p">:</span>
        <span class="n">recovered_address</span> <span class="o">=</span> <span class="n">w3</span><span class="p">.</span><span class="n">eth</span><span class="p">.</span><span class="n">account</span><span class="p">.</span><span class="n">recover_message</span><span class="p">(</span>
            <span class="n">signable_message</span><span class="o">=</span><span class="n">encode_defunct</span><span class="p">(</span><span class="n">text</span><span class="o">=</span><span class="n">body</span><span class="p">),</span>
            <span class="n">signature</span><span class="o">=</span><span class="n">HexBytes</span><span class="p">(</span><span class="n">signed_message</span><span class="p">),</span>
        <span class="p">)</span>
    <span class="k">except</span><span class="p">:</span>
        <span class="k">return</span> <span class="bp">None</span>
    <span class="c1"># make sure recovered address is correct
</span>    <span class="k">if</span> <span class="n">address</span> <span class="o">!=</span> <span class="n">recovered_address</span><span class="p">:</span>
        <span class="k">return</span> <span class="bp">None</span>
    <span class="k">return</span> <span class="n">recovered_address</span>
</code></pre></div></div>

<h4 id="siwe-authentication">SIWE Authentication</h4>

<p>A Django authentication backend is a class that implements two methods, <code class="language-plaintext highlighter-rouge">authenticate</code> and <code class="language-plaintext highlighter-rouge">get_user</code>. Let’s write a custom authentication backend that uses our verification methods to implement those methods with SIWE.</p>

<div class="language-python highlighter-rouge"><div class="highlight"><pre class="highlight"><code><span class="c1"># siweauth/backend.py
</span>
<span class="kn">from</span> <span class="nn">django.contrib.auth.backends</span> <span class="kn">import</span> <span class="n">BaseBackend</span>
<span class="kn">from</span> <span class="nn">web3</span> <span class="kn">import</span> <span class="n">Web3</span>
<span class="kn">from</span> <span class="nn">eth_account.messages</span> <span class="kn">import</span> <span class="n">SignableMessage</span>
<span class="kn">import</span> <span class="nn">logging</span>

<span class="kn">from</span> <span class="nn">siweauth.models</span> <span class="kn">import</span> <span class="n">SiweUser</span>
<span class="kn">from</span> <span class="nn">siweauth.auth</span> <span class="kn">import</span> <span class="n">check_siwe</span>

<span class="n">w3</span> <span class="o">=</span> <span class="n">Web3</span><span class="p">()</span>

<span class="k">class</span> <span class="nc">SiweBackend</span><span class="p">(</span><span class="n">BaseBackend</span><span class="p">):</span>
    <span class="s">"""
    Authentication backend for Sign-In with Ethereum.
    """</span>

    <span class="k">def</span> <span class="nf">authenticate</span><span class="p">(</span>
        <span class="bp">self</span><span class="p">,</span> <span class="n">request</span><span class="p">,</span> <span class="n">message</span><span class="p">:</span> <span class="n">SignableMessage</span> <span class="o">=</span> <span class="bp">None</span><span class="p">,</span> <span class="n">signed_message</span><span class="o">=</span><span class="bp">None</span>
    <span class="p">):</span>
        <span class="s">"""
        Authenticate a user with SIWE
        
        Args:
            request: The HTTP request
            message: The SIWE message
            signed_message: The signature of the message
            
        Returns:
            SiweUser: The authenticated user, or None if authentication fails
            
        Note:
            Creates a new user if one doesn't exist for the recovered address
        """</span>
        <span class="c1"># request must have message and signed_message fields
</span>        <span class="k">if</span> <span class="bp">None</span> <span class="ow">in</span> <span class="p">[</span><span class="n">message</span><span class="p">,</span> <span class="n">signed_message</span><span class="p">]:</span>
            <span class="k">return</span> <span class="bp">None</span>
        <span class="n">recovered_address</span> <span class="o">=</span> <span class="n">check_siwe</span><span class="p">(</span><span class="n">message</span><span class="p">,</span> <span class="n">signed_message</span><span class="p">)</span>
        <span class="k">if</span> <span class="n">recovered_address</span> <span class="ow">is</span> <span class="bp">None</span><span class="p">:</span>
            <span class="k">return</span> <span class="bp">None</span>
        <span class="c1"># if user exists, return user
</span>        <span class="n">user</span> <span class="o">=</span> <span class="n">SiweUser</span><span class="p">.</span><span class="n">objects</span><span class="p">.</span><span class="nb">filter</span><span class="p">(</span><span class="n">wallet</span><span class="o">=</span><span class="n">recovered_address</span><span class="p">).</span><span class="n">first</span><span class="p">()</span>
        <span class="c1"># if user doesn't exist, make a user for this wallet
</span>        <span class="k">if</span> <span class="n">user</span> <span class="ow">is</span> <span class="bp">None</span><span class="p">:</span>
            <span class="n">user</span> <span class="o">=</span> <span class="n">SiweUser</span><span class="p">.</span><span class="n">objects</span><span class="p">.</span><span class="n">create_user_address</span><span class="p">(</span><span class="n">recovered_address</span><span class="p">)</span>
        <span class="k">return</span> <span class="n">user</span>

    <span class="k">def</span> <span class="nf">get_user</span><span class="p">(</span><span class="bp">self</span><span class="p">,</span> <span class="n">user_address</span><span class="p">):</span>
        <span class="s">"""
        Retrieve a user by user address.
        
        Args:
            user_address: The address of the user to retrieve
            
        Returns:
            SiweUser: The user with the given address, or None if not found
        """</span>
        <span class="k">try</span><span class="p">:</span>
            <span class="k">return</span> <span class="n">SiweUser</span><span class="p">.</span><span class="n">objects</span><span class="p">.</span><span class="n">get</span><span class="p">(</span><span class="n">pk</span><span class="o">=</span><span class="n">user_address</span><span class="p">)</span>
        <span class="k">except</span> <span class="n">SiweUser</span><span class="p">.</span><span class="n">DoesNotExist</span><span class="p">:</span>
            <span class="k">return</span> <span class="bp">None</span>
</code></pre></div></div>

<p>Now, register SiweBackend in your settings.py file.</p>

<div class="language-python highlighter-rouge"><div class="highlight"><pre class="highlight"><code><span class="c1"># your_project/settings.py
</span><span class="p">...</span>
<span class="n">AUTHENTICATION_BACKENDS</span> <span class="o">=</span> <span class="p">[</span>
    <span class="s">'siweauth.backend.SiweBackend'</span><span class="p">,</span>
    <span class="p">...</span>
<span class="p">]</span>
<span class="p">...</span>
</code></pre></div></div>

<h3 id="siwe-views">SIWE Views</h3>

<p>Let’s write a view that the front end can call to get a nonce.</p>

<div class="language-python highlighter-rouge"><div class="highlight"><pre class="highlight"><code><span class="c1"># siweauth/views.py
</span>
<span class="kn">import</span> <span class="nn">datetime</span>
<span class="kn">import</span> <span class="nn">pytz</span>
<span class="kn">import</span> <span class="nn">secrets</span>
<span class="kn">from</span> <span class="nn">django.http</span> <span class="kn">import</span> <span class="n">JsonResponse</span>
<span class="kn">from</span> <span class="nn">django.views.decorators.http</span> <span class="kn">import</span> <span class="n">require_http_methods</span>
<span class="kn">from</span> <span class="nn">siweauth.models</span> <span class="kn">import</span> <span class="n">Nonce</span>


<span class="o">@</span><span class="n">require_http_methods</span><span class="p">([</span><span class="s">"GET"</span><span class="p">])</span>
<span class="k">def</span> <span class="nf">get_nonce</span><span class="p">(</span><span class="n">request</span><span class="p">):</span>
    <span class="s">"""
    Generate and return a new nonce for SIWE authentication.
    """</span>
    <span class="n">now</span> <span class="o">=</span> <span class="n">datetime</span><span class="p">.</span><span class="n">datetime</span><span class="p">.</span><span class="n">now</span><span class="p">(</span><span class="n">tz</span><span class="o">=</span><span class="n">pytz</span><span class="p">.</span><span class="n">UTC</span><span class="p">)</span>

    <span class="k">for</span> <span class="n">n</span> <span class="ow">in</span> <span class="n">Nonce</span><span class="p">.</span><span class="n">objects</span><span class="p">.</span><span class="nb">filter</span><span class="p">(</span><span class="n">expiration__lte</span><span class="o">=</span><span class="n">datetime</span><span class="p">.</span><span class="n">datetime</span><span class="p">.</span><span class="n">now</span><span class="p">(</span><span class="n">tz</span><span class="o">=</span><span class="n">pytz</span><span class="p">.</span><span class="n">UTC</span><span class="p">)):</span>
        <span class="n">n</span><span class="p">.</span><span class="n">delete</span><span class="p">()</span>
    <span class="n">n</span> <span class="o">=</span> <span class="n">Nonce</span><span class="p">(</span><span class="n">value</span><span class="o">=</span><span class="n">secrets</span><span class="p">.</span><span class="n">token_hex</span><span class="p">(</span><span class="mi">12</span><span class="p">),</span> <span class="n">expiration</span><span class="o">=</span><span class="n">now</span> <span class="o">+</span> <span class="n">datetime</span><span class="p">.</span><span class="n">timedelta</span><span class="p">(</span><span class="n">hours</span><span class="o">=</span><span class="mi">3</span><span class="p">))</span>
    <span class="n">n</span><span class="p">.</span><span class="n">save</span><span class="p">()</span>

    <span class="k">return</span> <span class="n">JsonResponse</span><span class="p">({</span><span class="s">"nonce"</span><span class="p">:</span> <span class="n">n</span><span class="p">.</span><span class="n">value</span><span class="p">})</span>
</code></pre></div></div>

<p>Here’s an example request to this view:</p>

<div class="language-http highlighter-rouge"><div class="highlight"><pre class="highlight"><code><span class="nf">GET</span> <span class="nn">/api/auth/nonce/</span> <span class="k">HTTP</span><span class="o">/</span><span class="m">1.1</span>
<span class="na">Host</span><span class="p">:</span> <span class="s">your-dapp.xyz</span>
</code></pre></div></div>

<p>Finally, we need a view that will handle SIWE login requests. This view will call our custom SIWE authentication backend and log the user in if they pass our SIWE verification. Here is a super simple view for this purpose:</p>

<div class="language-python highlighter-rouge"><div class="highlight"><pre class="highlight"><code><span class="c1"># siweauth/views.py
</span><span class="kn">from</span> <span class="nn">django.contrib.auth</span> <span class="kn">import</span> <span class="n">login</span>
<span class="kn">from</span> <span class="nn">your_siwe_package</span> <span class="kn">import</span> <span class="n">authenticate</span>

<span class="k">def</span> <span class="nf">siwe_login_view</span><span class="p">(</span><span class="n">request</span><span class="p">):</span>
    <span class="s">"""Handle SIWE login requests."""</span>
    <span class="n">message</span> <span class="o">=</span> <span class="n">request</span><span class="p">.</span><span class="n">POST</span><span class="p">.</span><span class="n">get</span><span class="p">(</span><span class="s">"message"</span><span class="p">)</span>
    <span class="n">signed_message</span> <span class="o">=</span> <span class="n">request</span><span class="p">.</span><span class="n">POST</span><span class="p">.</span><span class="n">get</span><span class="p">(</span><span class="s">"signature"</span><span class="p">)</span>
    <span class="c1"># This calls your SIWE authentication backend
</span>    <span class="n">user</span> <span class="o">=</span> <span class="n">authenticate</span><span class="p">(</span><span class="n">message</span><span class="o">=</span><span class="n">message</span><span class="p">,</span> <span class="n">signed_message</span><span class="o">=</span><span class="n">signed_message</span><span class="p">)</span>
    <span class="k">if</span> <span class="n">user</span> <span class="ow">is</span> <span class="ow">not</span> <span class="bp">None</span><span class="p">:</span>
        <span class="n">login</span><span class="p">(</span><span class="n">request</span><span class="p">,</span> <span class="n">user</span><span class="p">)</span>  <span class="c1"># This creates a session and sets the sessionid cookie
</span>        <span class="k">return</span> <span class="n">JsonResponse</span><span class="p">({</span><span class="s">"success"</span><span class="p">:</span> <span class="bp">True</span><span class="p">})</span>
    <span class="k">else</span><span class="p">:</span>
        <span class="k">return</span> <span class="n">JsonResponse</span><span class="p">({</span><span class="s">"success"</span><span class="p">:</span> <span class="bp">False</span><span class="p">},</span> <span class="n">status</span><span class="o">=</span><span class="mi">401</span><span class="p">)</span>
</code></pre></div></div>

<p>Here’s an example request to this view:</p>

<div class="language-http highlighter-rouge"><div class="highlight"><pre class="highlight"><code><span class="nf">POST</span> <span class="nn">/login</span> <span class="k">HTTP</span><span class="o">/</span><span class="m">1.1</span>
<span class="na">Host</span><span class="p">:</span> <span class="s">your-dapp.xyz</span>
<span class="na">Content-Type</span><span class="p">:</span> <span class="s">application/x-www-form-urlencoded</span>
<span class="s">message=your_siwe_message&amp;signature=0xYourSignature</span>
</code></pre></div></div>

<p>where <code class="language-plaintext highlighter-rouge">your_siwe_message</code> is the <a href="#an-example-siwe-message">plaintext SIWE message</a>, and <code class="language-plaintext highlighter-rouge">0xYourSignature</code> is the signature of that message.</p>

<h3 id="testing-your-implementation">Testing your implementation</h3>

<p>Testing your SIWE implementation is essential for maintaining security. To get some ideas for tests, check out my implementation’s <a href="https://github.com/matthew-ritch/facthound/tree/main/siweauth/tests.py">siweauth tests</a>. In general, you will need to</p>

<ul>
  <li>Test your Nonce model functions</li>
  <li>Test your SIWE message parsing and verification methods</li>
  <li>Test your views for getting nonces and for submitting SIWE messages</li>
</ul>

<h2 id="conclusion">Conclusion</h2>

<p>Rig up your frontend to use these login views and you will be off to the races with your hybrid dApp. Your users will be able to log in with Ethereum and use your app without breaking their decentralized flow, but you will still be able to track user info with a performant and scalable centralized database.</p>

<p>When you’re ready to put your hybrid dApp on the internet, my <a href="/blog/2025/09/02/WDD-Django-React/">Web Dev for Dirtbags series</a> covers deploying a Django + React app on your own server, and <a href="/blog/2025/09/03/WDD-VPS-Security/">Part 3</a> covers hardening that server.</p>]]></content><author><name>Matthew Ritch</name></author><category term="blog" /><category term="web development" /><category term="ethereum" /><category term="evm" /><category term="siwe" /><category term="django" /><summary type="html"><![CDATA[Learn how to implement Sign-In with Ethereum (SIWE) authentication in Django with a custom user model, verification logic, an authentication backend, and login views.]]></summary></entry><entry><title type="html">Web Dev for Dirtbags Part 3: VPS Security</title><link href="https://matthewritch.com/blog/2025/09/03/WDD-VPS-Security/" rel="alternate" type="text/html" title="Web Dev for Dirtbags Part 3: VPS Security" /><published>2025-09-03T08:00:00-04:00</published><updated>2025-09-03T08:00:00-04:00</updated><id>https://matthewritch.com/blog/2025/09/03/WDD-VPS-Security</id><content type="html" xml:base="https://matthewritch.com/blog/2025/09/03/WDD-VPS-Security/"><![CDATA[<!-- - vps security basics
        - ssh access only https://docs.digitalocean.com/products/droplets/how-to/add-ssh-keys/to-existing-droplet/#with-ssh-copy-id
        - ufw setup 
        - unattended upgrades?
        - systemd service hardening?
        - fail2ban 
        - nginx https://github.com/trimstray/nginx-admins-handbook/blob/master/doc/RULES.md#beginner-always-keep-nginx-up-to-date
-->

<ul id="markdown-toc">
  <li><a href="#purpose-security" id="markdown-toc-purpose-security">Purpose: security</a></li>
  <li><a href="#prerequisites" id="markdown-toc-prerequisites">Prerequisites</a></li>
  <li><a href="#lock-down-access" id="markdown-toc-lock-down-access">Lock down access</a>    <ul>
      <li><a href="#ssh-keys" id="markdown-toc-ssh-keys">ssh keys</a></li>
      <li><a href="#firewall" id="markdown-toc-firewall">Firewall</a></li>
      <li><a href="#blacklisting-and-fail2ban" id="markdown-toc-blacklisting-and-fail2ban">Blacklisting and Fail2ban</a></li>
    </ul>
  </li>
  <li><a href="#keep-your-installs-fresh" id="markdown-toc-keep-your-installs-fresh">Keep your installs fresh</a>    <ul>
      <li><a href="#system-packages" id="markdown-toc-system-packages">System packages</a></li>
      <li><a href="#npm" id="markdown-toc-npm">npm</a></li>
      <li><a href="#python-venv" id="markdown-toc-python-venv">Python venv</a></li>
    </ul>
  </li>
  <li><a href="#restrict-custom-systemd-services-and-nginx" id="markdown-toc-restrict-custom-systemd-services-and-nginx">Restrict custom systemd services and Nginx</a>    <ul>
      <li><a href="#restricting-systemd-services-permissions" id="markdown-toc-restricting-systemd-services-permissions">Restricting systemd services’ permissions</a></li>
      <li><a href="#add-systemd-security-options" id="markdown-toc-add-systemd-security-options">Add systemd security options</a></li>
      <li><a href="#configure-nginx-for-security" id="markdown-toc-configure-nginx-for-security">Configure Nginx for security</a></li>
    </ul>
  </li>
</ul>

<p><em>This is Part 3 of the Web Dev for Dirtbags series. Start with <a href="/blog/2025/08/27/WDD-Static/">Part 1: Basics and Static Sites</a> and <a href="/blog/2025/09/02/WDD-Django-React/">Part 2: Deploying a Django + React Web App</a>.</em></p>

<h2 id="purpose-security">Purpose: security</h2>

<p>You should take a few simple steps to harden your web server’s security. In this guide, I will show you how to:</p>
<ol>
  <li>Lock down access with ssh keys, a firewall, and fail2ban for banning vulnerability scanners</li>
  <li>Enable unattended upgrades to prevent fresh exploits</li>
  <li>Restrict permissions for systemd services and Nginx</li>
</ol>

<p>These instructions are for Ubuntu/Debian-based systems. This probably applies to your cheap VPS, but you should make sure.</p>

<h2 id="prerequisites">Prerequisites</h2>

<p>I will also assume that you have a web server set up and ready to serve a website. If you don’t have these set up yet, I recommend reading and following my previous posts on serving <a href="https://matthewritch.com/blog/2025/08/27/WDD-Static/">static</a> and <a href="https://matthewritch.com/blog/2025/09/02/WDD-Django-React/">dynamic</a> sites.</p>

<h2 id="lock-down-access">Lock down access</h2>

<p>Your server and your users’ data can be accessed directly through ssh or indirectly through the pages that you are serving over its ports. Let’s close some of those openings.</p>

<h3 id="ssh-keys">ssh keys</h3>

<p>To start, let’s make sure that your server can only be accessed through ssh keys. ssh keys are more secure than username and password logins because they are much harder to brute force or guess. Additionally, they are not transmitted across the network to your remote VPS, so your password cannot be intercepted during transmission.</p>

<p>To set up ssh key access to your remote machine:</p>

<ol>
  <li>On your local machine, run <code class="language-plaintext highlighter-rouge">ssh-keygen -t ed25519</code> to generate a new key pair with the ed25519 algorithm. Set up a passphrase when prompted for extra security.</li>
  <li>Copy the public key that you just generated, by default <code class="language-plaintext highlighter-rouge">id_ed25519.pub</code>, over to the <code class="language-plaintext highlighter-rouge">~/.ssh/authorized_keys</code> folder on your VPS:
    <div class="language-bash highlighter-rouge"><div class="highlight"><pre class="highlight"><code><span class="nb">cat</span> ~/.ssh/id_ed25519.pub | ssh username@your-vps-ip <span class="s2">"mkdir -p ~/.ssh &amp;&amp; cat &gt;&gt; ~/.ssh/authorized_keys"</span>
</code></pre></div>    </div>
    <p>Replace <code class="language-plaintext highlighter-rouge">username</code> with your VPS username and <code class="language-plaintext highlighter-rouge">your-vps-ip</code> with your server’s IP address.
If you don’t have ssh access, create this file and add the public key manually via your VPS provider’s control panel.</p>
  </li>
  <li>Add the private key to your ssh agent:
    <div class="language-bash highlighter-rouge"><div class="highlight"><pre class="highlight"><code><span class="nb">eval</span> <span class="s2">"</span><span class="si">$(</span>ssh-agent <span class="nt">-s</span><span class="si">)</span><span class="s2">"</span> <span class="c"># for linux and mac. for windows use ssh-agent -s</span>
ssh-add ~/.ssh/id_ed25519 <span class="c"># or whatever file name you gave your private key</span>
</code></pre></div>    </div>
  </li>
  <li>Test your ssh key authentication by running:
    <div class="language-bash highlighter-rouge"><div class="highlight"><pre class="highlight"><code>ssh username@your-vps-ip
</code></pre></div>    </div>
    <p>If you were able to log in without your password, then this worked!</p>
  </li>
</ol>

<p>ONLY ONCE YOU CONFIRM THAT YOU CAN SSH IN WITH THE KEY, you can disable password authentication:</p>

<ol>
  <li>On your remote machine, modify <code class="language-plaintext highlighter-rouge">/etc/ssh/sshd_config</code> to include this line:
    <div class="language-bash highlighter-rouge"><div class="highlight"><pre class="highlight"><code>PasswordAuthentication no
</code></pre></div>    </div>
  </li>
  <li>Restart the SSH service:
    <div class="language-bash highlighter-rouge"><div class="highlight"><pre class="highlight"><code><span class="nb">sudo </span>systemctl restart ssh
</code></pre></div>    </div>
    <p>If everything is set up correctly, you should be able to log in without being prompted for a password.</p>
  </li>
</ol>

<h3 id="firewall">Firewall</h3>

<p>A firewall is a service that filters and blocks connections based on predefined rules. <a href="https://wiki.ubuntu.com/UncomplicatedFirewall">Uncomplicated Firewall</a>, or <code class="language-plaintext highlighter-rouge">ufw</code>, is a simple and user-friendly interface for defining a firewall.</p>

<p>To set up <code class="language-plaintext highlighter-rouge">ufw</code> on your VPS:</p>

<ol>
  <li>Make sure you have ssh access to your server. Follow the previous section if you don’t. Log in using your SSH key.</li>
  <li>Install <code class="language-plaintext highlighter-rouge">ufw</code> if it’s not already installed:
    <div class="language-bash highlighter-rouge"><div class="highlight"><pre class="highlight"><code><span class="nb">sudo </span>apt-get <span class="nb">install </span>ufw
</code></pre></div>    </div>
  </li>
  <li>Allow SSH connections and HTTP/HTTPS traffic:
    <div class="language-bash highlighter-rouge"><div class="highlight"><pre class="highlight"><code><span class="nb">sudo </span>ufw allow ssh
<span class="nb">sudo </span>ufw allow http
<span class="nb">sudo </span>ufw allow https
</code></pre></div>    </div>
  </li>
  <li>Enable the firewall:
    <div class="language-bash highlighter-rouge"><div class="highlight"><pre class="highlight"><code><span class="nb">sudo </span>ufw <span class="nb">enable</span>
</code></pre></div>    </div>
  </li>
  <li>Check the status of the firewall:
    <div class="language-bash highlighter-rouge"><div class="highlight"><pre class="highlight"><code><span class="nb">sudo </span>ufw status
</code></pre></div>    </div>
  </li>
</ol>

<h3 id="blacklisting-and-fail2ban">Blacklisting and Fail2ban</h3>

<p>Automated vulnerability-finders are constantly scanning open ports for accidentally exposed files. If you check the access logs for your site, you will probably see loads of failed requests looking for seemingly random .php, .xml, .env, or other sensitive files. Here’s an example log trace from my website.</p>
<div class="language-console highlighter-rouge"><div class="highlight"><pre class="highlight"><code><span class="go">20.196.80.178 - - [03/Sep/2025:16:14:41 +0000] "GET /dfre.php HTTP/1.1" 404 162 "-" "-"
20.196.80.178 - - [03/Sep/2025:16:14:42 +0000] "GET /disagimons.php HTTP/1.1" 404 162 "-" "-"
20.196.80.178 - - [03/Sep/2025:16:14:42 +0000] "GET /disagreop.php HTTP/1.1" 404 162 "-" "-"
20.196.80.178 - - [03/Sep/2025:16:14:43 +0000] "GET /manager.php HTTP/1.1" 404 162 "-" "-"
20.196.80.178 - - [03/Sep/2025:16:14:43 +0000] "GET /uploan.php HTTP/1.1" 404 162 "-" "-"
</span><span class="gp">104.248.157.27 - - [03/Sep/2025:16:35:29 +0000] "GET //wp-includes/wlwmanifest.xml HTTP/1.1" 404 564 "-" "Mozilla/5.0 (Windows NT 10.0;</span><span class="w"> </span>Win64<span class="p">;</span> x64<span class="o">)</span> AppleWebKit/537.36 <span class="o">(</span>KHTML, like Gecko<span class="o">)</span> Chrome/78.0.3904.108 Safari/537.36<span class="s2">"
</span><span class="gp">104.248.157.27 - - [03/Sep/2025:16:35:29 +0000] "GET //xmlrpc.php?rsd HTTP/1.1" 404 564 "-" "Mozilla/5.0 (Windows NT 10.0;</span><span class="w"> </span><span class="s2">Win64; x64) AppleWebKit/537.36 (KHTML, like Gecko) Chrome/78.0.3904.108 Safari/537.36"</span>
<span class="gp">104.248.157.27 - - [03/Sep/2025:16:35:29 +0000] "GET //blog/wp-includes/wlwmanifest.xml HTTP/1.1" 404 564 "-" "Mozilla/5.0 (Windows NT 10.0;</span><span class="w"> </span>Win64<span class="p">;</span> x64<span class="o">)</span> AppleWebKit/537.36 <span class="o">(</span>KHTML, like Gecko<span class="o">)</span> Chrome/78.0.3904.108 Safari/537.36<span class="s2">"
</span></code></pre></div></div>

<p>This shows automated scanning from two separate source IP addresses. Notice that each of these requests are returned 404 not found errors.</p>

<p><a href="https://github.com/fail2ban/fail2ban">Fail2ban</a> is a service that monitors requests to your page for suspicious activity. It can automatically block IP addresses that show malicious signs, such as too many password failures or seeking for exploits like those shown in the log.</p>

<p>To set up Fail2ban on your VPS:</p>

<ol>
  <li>Install Fail2ban:
    <div class="language-bash highlighter-rouge"><div class="highlight"><pre class="highlight"><code><span class="nb">sudo </span>apt-get <span class="nb">install </span>fail2ban
</code></pre></div>    </div>
  </li>
  <li>Configure Fail2ban to block repeated failed requestors:
    <div class="language-bash highlighter-rouge"><div class="highlight"><pre class="highlight"><code><span class="nb">sudo cp</span> /etc/fail2ban/jail.conf /etc/fail2ban/jail.local
<span class="nb">sudo </span>nano /etc/fail2ban/jail.local
</code></pre></div>    </div>
    <p>Within the <code class="language-plaintext highlighter-rouge">[DEFAULT]</code> section, set these values:</p>
    <div class="language-plaintext highlighter-rouge"><div class="highlight"><pre class="highlight"><code>bantime = 1h
findtime = 1h
maxretry = 5
</code></pre></div>    </div>
  </li>
  <li>Start the Fail2ban service:
    <div class="language-bash highlighter-rouge"><div class="highlight"><pre class="highlight"><code><span class="nb">sudo </span>systemctl start fail2ban
</code></pre></div>    </div>
  </li>
  <li>Enable Fail2ban to start on boot:
    <div class="language-bash highlighter-rouge"><div class="highlight"><pre class="highlight"><code><span class="nb">sudo </span>systemctl <span class="nb">enable </span>fail2ban
</code></pre></div>    </div>
  </li>
</ol>

<h2 id="keep-your-installs-fresh">Keep your installs fresh</h2>

<p>Another key aspect of server security is to stay on top of updates for your dependencies and server software.</p>

<h3 id="system-packages">System packages</h3>

<p>To update your system packages, use the following commands:</p>

<div class="language-bash highlighter-rouge"><div class="highlight"><pre class="highlight"><code><span class="nb">sudo </span>apt-get update
<span class="nb">sudo </span>apt-get upgrade
</code></pre></div></div>

<p>To set up automatic updates, you can install and enable the <code class="language-plaintext highlighter-rouge">unattended-upgrades</code> package, which automatically installs security updates:</p>

<div class="language-bash highlighter-rouge"><div class="highlight"><pre class="highlight"><code><span class="nb">sudo </span>apt-get <span class="nb">install </span>unattended-upgrades
<span class="nb">sudo </span>dpkg-reconfigure <span class="nt">--priority</span><span class="o">=</span>low unattended-upgrades
</code></pre></div></div>

<h3 id="npm">npm</h3>

<p>For Node.js applications, you can update your npm packages with:</p>

<div class="language-bash highlighter-rouge"><div class="highlight"><pre class="highlight"><code>npm update
</code></pre></div></div>

<p>There are packages for conducting automatic updates for npm, but it’s simpler to set a cron job to execute <code class="language-plaintext highlighter-rouge">npm update</code> at your desired frequency.</p>
<div class="language-bash highlighter-rouge"><div class="highlight"><pre class="highlight"><code>nano /etc/cron.daily/npm-update.sh
</code></pre></div></div>
<p>Copy this into <code class="language-plaintext highlighter-rouge">nano /etc/cron.daily/npm-update.sh</code>:</p>
<div class="language-bash highlighter-rouge"><div class="highlight"><pre class="highlight"><code><span class="c">#!/bin/bash</span>
<span class="nb">cd</span> /path/to/your/nodejs/app
npm update
</code></pre></div></div>
<p>And give the cron job execute permissions:</p>
<div class="language-bash highlighter-rouge"><div class="highlight"><pre class="highlight"><code><span class="nb">chmod</span> +x /etc/cron.daily/npm-update.sh
</code></pre></div></div>

<h3 id="python-venv">Python venv</h3>

<p>For Python applications, you can update your virtual environment packages with:</p>

<div class="language-bash highlighter-rouge"><div class="highlight"><pre class="highlight"><code><span class="nb">source</span> /path/to/your/venv/bin/activate
pip <span class="nb">install</span> <span class="nt">--upgrade</span> pip
pip list <span class="nt">--outdated</span> | <span class="nb">awk</span> <span class="s1">'NR&gt;2 {print $1}'</span> | xargs <span class="nt">-n1</span> pip <span class="nb">install</span> <span class="nt">-U</span>
deactivate
</code></pre></div></div>

<p>You can also set a cron job to automate this process.</p>
<div class="language-bash highlighter-rouge"><div class="highlight"><pre class="highlight"><code>nano /etc/cron.daily/venv-update.sh
</code></pre></div></div>
<p>Copy this into <code class="language-plaintext highlighter-rouge">nano /etc/cron.daily/venv-update.sh</code>:</p>
<div class="language-bash highlighter-rouge"><div class="highlight"><pre class="highlight"><code><span class="c">#!/bin/bash</span>
<span class="nb">source</span> /path/to/your/venv/bin/activate
pip <span class="nb">install</span> <span class="nt">--upgrade</span> pip
pip list <span class="nt">--outdated</span> | <span class="nb">awk</span> <span class="s1">'NR&gt;2 {print $1}'</span> | xargs <span class="nt">-n1</span> pip <span class="nb">install</span> <span class="nt">-U</span>
deactivate
</code></pre></div></div>
<p>And give the cron job execute permissions:</p>
<div class="language-bash highlighter-rouge"><div class="highlight"><pre class="highlight"><code><span class="nb">chmod</span> +x /etc/cron.daily/venv-update.sh
</code></pre></div></div>

<h2 id="restrict-custom-systemd-services-and-nginx">Restrict custom systemd services and Nginx</h2>

<p>Your <a href="https://www.man7.org/linux/man-pages/man1/init.1.html">systemd</a> services and your <a href="https://nginx.org/en/docs/">Nginx</a> configuration should be set up to use the minimal permissions necessary to function. This means:</p>
<ol>
  <li>Running services with unprivileged users and groups</li>
  <li>Add systemd security options to each service</li>
  <li>Configure nginx to also use the same restricted user and group as your systemd services</li>
</ol>

<p>You can run <code class="language-plaintext highlighter-rouge">systemd-analyze security</code> on your server to see a list of services and their vulnerability levels. 
To address these vulnerabilities, you must restrict each service in this list.</p>

<p>Run <code class="language-plaintext highlighter-rouge">systemd-analyze security servicename</code> to see detailed information for each service.</p>

<h3 id="restricting-systemd-services-permissions">Restricting systemd services’ permissions</h3>

<ol>
  <li>Edit your systemd service file (something like <code class="language-plaintext highlighter-rouge">/etc/systemd/system/yoursite.service</code>) to contain user and group definitions for some unprivileged group. We will use <code class="language-plaintext highlighter-rouge">www-data</code> for both.
    <div class="language-bash highlighter-rouge"><div class="highlight"><pre class="highlight"><code><span class="c"># filepath: /etc/systemd/system/yoursite.service</span>
<span class="c"># ...existing code...</span>
<span class="o">[</span>Service]
<span class="nv">User</span><span class="o">=</span>www-data
<span class="nv">Group</span><span class="o">=</span>www-data
<span class="c"># ...existing code...</span>
</code></pre></div>    </div>
  </li>
  <li>Restrict file permissions for the files the service accesses. For example, if your service accesses files in <code class="language-plaintext highlighter-rouge">/var/www/yoursite/servicefolder</code>, you can run:
    <div class="language-bash highlighter-rouge"><div class="highlight"><pre class="highlight"><code><span class="nb">sudo chown</span> <span class="nt">-R</span> www-data:www-data /var/www/yoursite/servicefolder <span class="c"># change ownership to our user and group</span>
<span class="nb">sudo chmod</span> <span class="nt">-R</span> 755 /var/www/yoursite/servicefolder <span class="c"># grants owner rwx, group rx, others rx</span>
</code></pre></div>    </div>
  </li>
  <li>Restart the service to apply the changes:
    <div class="language-bash highlighter-rouge"><div class="highlight"><pre class="highlight"><code><span class="nb">sudo </span>systemctl daemon-reload
<span class="nb">sudo </span>systemctl restart yoursite
</code></pre></div>    </div>
  </li>
</ol>

<h3 id="add-systemd-security-options">Add systemd security options</h3>

<p>Add some extra protection to your service by restricting its capabilities. Do this for each service you use.</p>

<ol>
  <li>Edit your systemd service file (something like <code class="language-plaintext highlighter-rouge">/etc/systemd/system/yoursite.service</code>) to enable security options under the <code class="language-plaintext highlighter-rouge">[SERVICE]</code> header. For example:
    <div class="language-bash highlighter-rouge"><div class="highlight"><pre class="highlight"><code><span class="c"># filename: /etc/systemd/system/yoursite.service</span>
<span class="o">[</span>Service]
<span class="nv">PrivateNetwork</span><span class="o">=</span><span class="nb">yes</span> <span class="c"># make this service only accessible to internal network requests. Only use if Nginx is also configured to use this socket</span>
<span class="nv">PrivateTmp</span><span class="o">=</span><span class="nb">yes</span> <span class="c"># create a private /tmp for this service</span>
<span class="nv">ProtectHome</span><span class="o">=</span><span class="nb">yes</span> <span class="c"># prevent access to /home, /root, and /run/user </span>
<span class="nv">NoNewPrivileges</span><span class="o">=</span><span class="nb">true</span> <span class="c"># prevent privilege escalation</span>
<span class="nv">ProtectSystem</span><span class="o">=</span>full <span class="c"># make /usr read-only</span>
<span class="nv">ProtectKernelModules</span><span class="o">=</span><span class="nb">yes</span> <span class="c"># prevent loading kernel modules</span>
</code></pre></div>    </div>
  </li>
  <li>Restart the service to apply the changes:
    <div class="language-bash highlighter-rouge"><div class="highlight"><pre class="highlight"><code><span class="nb">sudo </span>systemctl daemon-reload
<span class="nb">sudo </span>systemctl restart yoursite
</code></pre></div>    </div>
  </li>
</ol>

<h3 id="configure-nginx-for-security">Configure Nginx for security</h3>

<p>Nginx starts as root so that it can access all of your server’s files, such as SSL certs. However, you should ensure that it is configured to drop to a user with lower privileges after it starts up. We will do this with <code class="language-plaintext highlighter-rouge">user</code> directive in your Nginx configuration file, usually located at <code class="language-plaintext highlighter-rouge">/etc/nginx/nginx.conf</code>.</p>

<p>Make sure that the user is set to a lower privileged user, such as <code class="language-plaintext highlighter-rouge">www-data</code> from before:</p>
<div class="language-bash highlighter-rouge"><div class="highlight"><pre class="highlight"><code><span class="c"># filename: /etc/nginx/nginx.conf</span>
user www-data<span class="p">;</span>
</code></pre></div></div>

<p>Nginx by default emits its version on error pages and in the “Server” response header field. To disable this, add the following line to your Nginx configuration file:</p>
<div class="language-bash highlighter-rouge"><div class="highlight"><pre class="highlight"><code><span class="c"># filename: /etc/nginx/nginx.conf</span>
server_tokens off<span class="p">;</span>
</code></pre></div></div>

<p>Some HTTP methods may be used to exploit vulnerabilities. For instance, <code class="language-plaintext highlighter-rouge">PUT</code> can be used to replace your server files with malicious ones. We can restrict Nginx to only allow certain HTTP methods. For instance, if your app only needs to support <code class="language-plaintext highlighter-rouge">GET</code> and <code class="language-plaintext highlighter-rouge">POST</code>, you can restrict Nginx to those with this:</p>
<div class="language-bash highlighter-rouge"><div class="highlight"><pre class="highlight"><code><span class="c"># filename: /etc/nginx/nginx.conf</span>
server <span class="o">{</span>
    location / <span class="o">{</span>
        limit_except GET POST <span class="o">{</span>
            deny all<span class="p">;</span>
        <span class="o">}</span>
    <span class="o">}</span>
<span class="o">}</span>
</code></pre></div></div>

<p>You can also add these restrictions to your site’s specific Nginx configuration, locatated somewhere like <code class="language-plaintext highlighter-rouge">/etc/nginx/sites-available/your-site.conf</code>. The above modifications apply to all Nginx instances running on your server.</p>]]></content><author><name>Matthew Ritch</name></author><category term="blog" /><category term="web development" /><category term="nginx" /><category term="digitalocean" /><category term="ssh" /><category term="security" /><category term="dirtbag" /><summary type="html"><![CDATA[Learn some easy steps to harden your web server's security.]]></summary></entry><entry><title type="html">Web Dev for Dirtbags Part 2: Deploying a Django + React Web App</title><link href="https://matthewritch.com/blog/2025/09/02/WDD-Django-React/" rel="alternate" type="text/html" title="Web Dev for Dirtbags Part 2: Deploying a Django + React Web App" /><published>2025-09-02T08:00:00-04:00</published><updated>2025-09-02T08:00:00-04:00</updated><id>https://matthewritch.com/blog/2025/09/02/WDD-Django-React</id><content type="html" xml:base="https://matthewritch.com/blog/2025/09/02/WDD-Django-React/"><![CDATA[<ul id="markdown-toc">
  <li><a href="#purpose-hosting-a-dynamic-app" id="markdown-toc-purpose-hosting-a-dynamic-app">Purpose: hosting a dynamic app</a></li>
  <li><a href="#dynamic-web-pages" id="markdown-toc-dynamic-web-pages">Dynamic web pages</a></li>
  <li><a href="#prerequisites" id="markdown-toc-prerequisites">Prerequisites</a></li>
  <li><a href="#configuring-django" id="markdown-toc-configuring-django">Configuring Django</a>    <ul>
      <li><a href="#python-environment" id="markdown-toc-python-environment">Python environment</a></li>
      <li><a href="#namespacing" id="markdown-toc-namespacing">Namespacing</a></li>
      <li><a href="#settingspy" id="markdown-toc-settingspy"><code class="language-plaintext highlighter-rouge">settings.py</code></a></li>
      <li><a href="#gunicorn" id="markdown-toc-gunicorn">Gunicorn</a></li>
    </ul>
  </li>
  <li><a href="#configuring-a-react-app-for-deployment" id="markdown-toc-configuring-a-react-app-for-deployment">Configuring a React app for deployment</a>    <ul>
      <li><a href="#npm-install" id="markdown-toc-npm-install"><code class="language-plaintext highlighter-rouge">npm install</code></a></li>
      <li><a href="#npm-run-build" id="markdown-toc-npm-run-build"><code class="language-plaintext highlighter-rouge">npm run build</code></a></li>
    </ul>
  </li>
  <li><a href="#configuring-nginx" id="markdown-toc-configuring-nginx">Configuring Nginx</a></li>
  <li><a href="#monitoring" id="markdown-toc-monitoring">Monitoring</a></li>
</ul>

<p><em>Part 2 of the Web Dev for Dirtbags series. Start with <a href="/blog/2025/08/27/WDD-Static/">Part 1: Basics and Static Sites</a>. Next, lock things down with <a href="/blog/2025/09/03/WDD-VPS-Security/">Part 3: VPS Security</a>.</em></p>

<h2 id="purpose-hosting-a-dynamic-app">Purpose: hosting a dynamic app</h2>

<p>We are going to get you off of localhost.</p>

<ol>
  <li>Learn to host a dynamic web app under your own domain name on your own server</li>
  <li>Gain web deployment skills:
    <ul>
      <li>Configuring a web server (Nginx) for serving a front end and a back end on the same server</li>
      <li>Managing application processes (e.g., using Gunicorn)</li>
    </ul>
  </li>
</ol>

<h2 id="dynamic-web-pages">Dynamic web pages</h2>

<p>Dynamic web pages or apps are interactive and will change based on user input or database state.</p>

<p>The “front end” of a dynamic web app is the process responsible for generating and updating the user interface. It does this by communicating with the “back end” of the web app, which manages data storage and business logic while responding to the front end’s requests.</p>

<p>This guide will show you how to host a dynamic web page. We will use the tried and true Django back-end framework and the ubiquitous React front-end framework as concrete examples, but we will also discuss general principles that apply to the myriad other web dev frameworks.</p>

<h2 id="prerequisites">Prerequisites</h2>

<p>For the rest of this guide, I will assume that you have basic <a href="https://docs.djangoproject.com/en/5.2/intro/tutorial01/">Django</a> and <a href="https://react.dev/learn">React</a> applications set up and running locally. Follow those links for the official tutorials if you need help getting started.</p>

<p>I will also assume that you have a Virtual Private Server (VPS) set up and ready to go and a domain name purchased and pointed at your VPS. If you don’t have these set up yet, I recommend reading and following <a href="https://matthewritch.com/blog/2025/08/27/WDD-Static/">my previous post</a> on setting up a VPS and domain name for hosting static sites.</p>

<h2 id="configuring-django">Configuring Django</h2>

<ol>
  <li>Set up a Python virtual environment</li>
  <li>Namespace all your back end’s urls</li>
  <li>Update your settings.py so your back end can serve requests from your front end</li>
  <li>Configure Gunicorn, your Web Server Gateway Interface (WSGI)</li>
</ol>

<h3 id="python-environment">Python environment</h3>

<p>Python comes stock with <code class="language-plaintext highlighter-rouge">venv</code>, a module for creating lightweight virtual environments. You are running this on a resource-constrained (cheap) VPS, so you should keep your venv lean.</p>

<p>From your dev environment, create a requirements.txt file by running <code class="language-plaintext highlighter-rouge">pip freeze &gt; requirements.txt</code>. Copy this to your server and create a venv there with:</p>
<div class="language-bash highlighter-rouge"><div class="highlight"><pre class="highlight"><code>python3 <span class="nt">-m</span> venv yourvenv
<span class="nb">source </span>yourvenv/bin/activate
pip <span class="nb">install</span> <span class="nt">-r</span> requirements.txt
</code></pre></div></div>

<h3 id="namespacing">Namespacing</h3>

<p>You should namespace all of your back end endpoints with some common prefix so they don’t clash with your front end’s urls (e.g., <code class="language-plaintext highlighter-rouge">/api/v1/whatever</code>).</p>

<p>Later, this will allow us to route front-end requests and back-end requests to separate processes more easily.</p>

<h3 id="settingspy"><code class="language-plaintext highlighter-rouge">settings.py</code></h3>

<p>Because your back end and front end are separate processes and will have their own origins, you will need to configure a few things in your settings.py so your back end can serve requests from your front end. If you do not do these things, then your back end cannot answer requests from your front end.</p>

<p>Cross-site request forgery (CSRF) is an exploit where a site’s browser is tricked into sending a request to a different site. This can cause the user to unwittingly submit forms on some other site (like their bank) or expose user information. To prevent this, browsers block cross-origin requests by default. However, because your front end and back end are on different origins, you will need to explicitly allow requests from your front end to your back end.</p>

<p>Cross-origin resource sharing (CORS) is a feature that permits browsers to make limited cross-origin requests. To enable your cross-origin requests, do the following:</p>

<ol>
  <li>In your server’s python environment, install the <code class="language-plaintext highlighter-rouge">django-cors-headers</code> package:
    <div class="language-bash highlighter-rouge"><div class="highlight"><pre class="highlight"><code>pip <span class="nb">install </span>django-cors-headers
</code></pre></div>    </div>
  </li>
  <li>Add <code class="language-plaintext highlighter-rouge">corsheaders</code> to your <code class="language-plaintext highlighter-rouge">INSTALLED_APPS</code> in <code class="language-plaintext highlighter-rouge">settings.py</code>:
    <div class="language-python highlighter-rouge"><div class="highlight"><pre class="highlight"><code><span class="n">INSTALLED_APPS</span> <span class="o">=</span> <span class="p">[</span>
 <span class="c1"># ...existing code...
</span> <span class="s">'corsheaders'</span><span class="p">,</span>
 <span class="c1"># ...existing code...
</span><span class="p">]</span>
</code></pre></div>    </div>
  </li>
  <li>Add the <code class="language-plaintext highlighter-rouge">CorsMiddleware</code> to your <code class="language-plaintext highlighter-rouge">MIDDLEWARE</code> in <code class="language-plaintext highlighter-rouge">settings.py</code>, making sure it’s placed above <code class="language-plaintext highlighter-rouge">CommonMiddleware</code>:
    <div class="language-python highlighter-rouge"><div class="highlight"><pre class="highlight"><code><span class="n">MIDDLEWARE</span> <span class="o">=</span> <span class="p">[</span>
 <span class="c1"># ...existing code...
</span> <span class="s">'corsheaders.middleware.CorsMiddleware'</span><span class="p">,</span>
 <span class="s">'django.middleware.common.CommonMiddleware'</span><span class="p">,</span>
 <span class="c1"># ...existing code...
</span><span class="p">]</span>
</code></pre></div>    </div>
  </li>
  <li>Specify the allowed origins in <code class="language-plaintext highlighter-rouge">settings.py</code>:
    <div class="language-python highlighter-rouge"><div class="highlight"><pre class="highlight"><code><span class="n">CORS_ALLOWED_ORIGINS</span> <span class="o">=</span> <span class="p">[</span>
 <span class="s">"https://your_domain.com"</span><span class="p">,</span>
 <span class="s">"http://localhost:3000"</span><span class="p">,</span> <span class="c1"># for local development
</span><span class="p">]</span>
</code></pre></div>    </div>
  </li>
  <li>Configure CSRF settings in <code class="language-plaintext highlighter-rouge">settings.py</code>:
    <div class="language-python highlighter-rouge"><div class="highlight"><pre class="highlight"><code><span class="n">CSRF_TRUSTED_ORIGINS</span> <span class="o">=</span> <span class="p">[</span>
 <span class="s">"https://your_domain.com"</span><span class="p">,</span>
 <span class="s">"http://localhost:3000"</span><span class="p">,</span> <span class="c1"># for local development
</span><span class="p">]</span>
</code></pre></div>    </div>
  </li>
</ol>

<p>To allow your server to be hosted on your domain, add the following to <code class="language-plaintext highlighter-rouge">settings.py</code>:</p>

<div class="language-python highlighter-rouge"><div class="highlight"><pre class="highlight"><code><span class="n">ALLOWED_HOSTS</span> <span class="o">=</span> <span class="p">[</span>
    <span class="s">"your_domain.com"</span><span class="p">,</span>
    <span class="s">"localhost"</span><span class="p">,</span> <span class="c1"># for local development
</span><span class="p">]</span>
</code></pre></div></div>

<p>Django’s secret key is used for cryptographic signing. You should set it in a <code class="language-plaintext highlighter-rouge">.env</code> file and load it in <code class="language-plaintext highlighter-rouge">settings.py</code>. We will tell Gunicorn which <code class="language-plaintext highlighter-rouge">.env</code> file to use in the next section.</p>

<h3 id="gunicorn">Gunicorn</h3>

<p>Gunicorn is a popular HTTP server for Python applications such as those built with Django or Flask. It receives HTTP requests from clients, forwards them to the Python process running your app, and forwards the Python app’s response to the the client. It can respond to multiple requests concurrently.</p>

<p>Install it with <code class="language-plaintext highlighter-rouge">pip install gunicorn</code>.</p>

<p>Make sure that all project files are owned by the user that will run the Gunicorn process (usually <code class="language-plaintext highlighter-rouge">www-data</code> on Ubuntu). You can change the ownership with:</p>

<div class="language-bash highlighter-rouge"><div class="highlight"><pre class="highlight"><code><span class="nb">sudo chown</span> <span class="nt">-R</span> www-data:www-data /var/www/yourproject
</code></pre></div></div>

<p>Test it with:</p>

<div class="language-bash highlighter-rouge"><div class="highlight"><pre class="highlight"><code>gunicorn your_project.wsgi:application
</code></pre></div></div>

<p>But, this is not how you should run Gunicorn on your server. Instead, you should use a service that will spin up Gunicorn when it is needed to serve a request and manage the process for you. <code class="language-plaintext highlighter-rouge">systemd</code> is the best choice for this.</p>

<p>To configure <code class="language-plaintext highlighter-rouge">systemd</code> to manage your Gunicorn process, we will create two files. <code class="language-plaintext highlighter-rouge">systemd.service</code> files define how the service will be controlled. <code class="language-plaintext highlighter-rouge">systemd.socket</code> files define how the service will be started.</p>

<ol>
  <li>Create a <code class="language-plaintext highlighter-rouge">systemd.socket</code> file for Gunicorn:
    <div class="language-ini highlighter-rouge"><div class="highlight"><pre class="highlight"><code><span class="c"># filepath: /etc/systemd/system/yoursite.socket
</span><span class="nn">[Unit]</span>
<span class="py">Description</span><span class="p">=</span><span class="s">gunicorn socket</span>
<span class="c"># Direct Gunicorn requests to this socket file
</span><span class="nn">[Socket]</span>
<span class="py">ListenStream</span><span class="p">=</span><span class="s">/run/yoursite.sock </span>
<span class="c"># Create this socket on boot
</span><span class="nn">[Install]</span>
<span class="py">WantedBy</span><span class="p">=</span><span class="s">sockets.target </span>
</code></pre></div>    </div>
    <p>Make sure to replace <code class="language-plaintext highlighter-rouge">yoursite</code> with the actual name of your project.</p>
  </li>
  <li>Create a <code class="language-plaintext highlighter-rouge">systemd.service</code> file for Gunicorn:
    <div class="language-ini highlighter-rouge"><div class="highlight"><pre class="highlight"><code><span class="c"># filepath: /etc/systemd/system/yoursite.service
</span><span class="nn">[Unit]</span>
<span class="py">Description</span><span class="p">=</span><span class="s">gunicorn daemon</span>
<span class="c"># Require the file we created in step 1
</span><span class="py">Requires</span><span class="p">=</span><span class="s">yoursite.socket </span>
<span class="py">After</span><span class="p">=</span><span class="s">network.target</span>
<span class="nn">[Service]</span>
<span class="c"># Allow this service to access back end files
</span><span class="py">User</span><span class="p">=</span><span class="s">www-data</span>
<span class="py">Group</span><span class="p">=</span><span class="s">www-data</span>
<span class="c"># Set base folder to the one that contains your Django project
</span><span class="py">WorkingDirectory</span><span class="p">=</span><span class="s">/var/www </span>
<span class="c"># 
</span><span class="py">ExecStart</span><span class="p">=</span><span class="s">/var/www/your-venv/bin/gunicorn </span><span class="se">\
</span>       <span class="s">--access-logfile - </span><span class="se">\ </span><span class="c"># log to stdout
</span>       <span class="s">--workers 3 </span><span class="se">\ </span><span class="c"># number of worker processes
</span>       <span class="s">--bind unix:/run/yoursite.sock </span><span class="se">\ </span><span class="c"># This is the socket file from step 1 defined with ListenStream
</span>       <span class="s">--access-logfile /var/log/gunicorn/yoursite.access.log </span><span class="se">\
</span>       <span class="s">--error-logfile /var/log/gunicorn/yoursite.error.log </span><span class="se">\
</span>       <span class="s">yoursite.wsgi:application</span>
<span class="c"># If you have environment variables
</span><span class="py">EnvironmentFile</span><span class="p">=</span><span class="s">/var/www/yoursite/.env </span>
<span class="nn">[Install]</span>
<span class="py">WantedBy</span><span class="p">=</span><span class="s">multi-user.target</span>
</code></pre></div>    </div>
    <p>Make sure to replace <code class="language-plaintext highlighter-rouge">yoursite</code> with the actual name of your project, set your correct <code class="language-plaintext highlighter-rouge">WorkingDirectory</code> and <code class="language-plaintext highlighter-rouge">EnvironmentFile</code>, and pass the correct virtual environment path in <code class="language-plaintext highlighter-rouge">ExecStart</code>.</p>
  </li>
  <li>Start and test your new Gunicorn service:
    <div class="language-bash highlighter-rouge"><div class="highlight"><pre class="highlight"><code><span class="nb">sudo </span>systemctl start yoursite.socket
<span class="nb">sudo </span>systemctl <span class="nb">enable </span>yoursite.socket
<span class="nb">sudo </span>systemctl status yoursite.socket
</code></pre></div>    </div>
    <p>You should see something like this:</p>
    <div class="language-console highlighter-rouge"><div class="highlight"><pre class="highlight"><code><span class="go">● yoursite.socket - gunicorn socket
</span><span class="gp">  Loaded: loaded (/etc/systemd/system/yoursite.socket;</span><span class="w"> </span>enabled<span class="p">;</span> preset: enabled<span class="o">)</span>
<span class="gp">  Active: active (running) since Tue 2025-09-02 22:12:07 UTC;</span><span class="w"> </span>7s ago
<span class="go">Triggers: ● yoursite.service
  Listen: /run/yoursite.sock (Stream)
  CGroup: /system.slice/yoursite.socket
</span></code></pre></div>    </div>
  </li>
  <li>Make sure you created the socket file
    <div class="language-bash highlighter-rouge"><div class="highlight"><pre class="highlight"><code>file /run/yoursite.sock
</code></pre></div>    </div>
    <p>You should see something like this:</p>
    <div class="language-console highlighter-rouge"><div class="highlight"><pre class="highlight"><code><span class="go">/run/yoursite.sock: socket
</span></code></pre></div>    </div>
  </li>
  <li>If you see errors or if one of those prints looks wrong, try reading the logs
    <div class="language-bash highlighter-rouge"><div class="highlight"><pre class="highlight"><code><span class="nb">sudo </span>journalctl <span class="nt">-u</span> yoursite.socket
</code></pre></div>    </div>
  </li>
  <li>To test the whole setup, try accessing an api endpoint with curl
    <div class="language-bash highlighter-rouge"><div class="highlight"><pre class="highlight"><code>curl <span class="nt">--no-buffer</span> <span class="nt">-XGET</span> <span class="nt">--unix-socket</span> /run/yoursite.sock localhost/api/endpoint/
</code></pre></div>    </div>
    <p>and you should see the HTTP response from your endpoint.</p>
  </li>
</ol>

<h2 id="configuring-a-react-app-for-deployment">Configuring a React app for deployment</h2>

<ol>
  <li>Install your dependencies and build your front-end app</li>
  <li>Build your app</li>
</ol>

<h3 id="npm-install"><code class="language-plaintext highlighter-rouge">npm install</code></h3>

<p>Your resource-constrained VPS will have very little RAM, so you need to keep your environment lean. This is where the super-cheap VPS approach can easily fail. Luckily, we can use the <code class="language-plaintext highlighter-rouge">--production</code> flag to skip dev dependencies:</p>

<div class="language-bash highlighter-rouge"><div class="highlight"><pre class="highlight"><code>npm <span class="nb">install</span> <span class="nt">--production</span>
</code></pre></div></div>

<p>If you see weird errors or if this run takes a very long time, you are probably coming up against your VPS’s RAM constraints.</p>

<p>We can get around this by using swap. Swap is disk memory that you can use to emulate RAM. Accessing swap is of course slower than accessing real RAM, but if you only need it for this one-time install, users will never see a slowdown from it.</p>

<p>Alternatively, install and build your app on your local machine and then transfer the build artifacts to your VPS.</p>

<h3 id="npm-run-build"><code class="language-plaintext highlighter-rouge">npm run build</code></h3>

<p>Once your dependencies are installed, you can build your React app:</p>

<div class="language-bash highlighter-rouge"><div class="highlight"><pre class="highlight"><code>npm run build
</code></pre></div></div>

<p>This will create a <code class="language-plaintext highlighter-rouge">build</code> directory containing your compiled web app’s files. If you are building on your local machine, just transfer the <code class="language-plaintext highlighter-rouge">build</code> directory to your VPS:</p>
<div class="language-bash highlighter-rouge"><div class="highlight"><pre class="highlight"><code>zip <span class="nt">-r</span> build.zip /path/to/your/build <span class="c"># create a zip archive of your site</span>
scp build.zip username@vps_ip_address:/var/www/yoursite <span class="c"># copy the zip file to the VPS</span>
</code></pre></div></div>

<h2 id="configuring-nginx">Configuring Nginx</h2>

<p>Reverse proxies are intermediate servers that route client requests to the appropriate backend server. We will use Nginx as a reverse proxy to either forward user requests to the Gunicorn socket or serve the React app’s static files.</p>

<ol>
  <li>If you don’t already have it, install Nginx on your VPS:
    <div class="language-bash highlighter-rouge"><div class="highlight"><pre class="highlight"><code><span class="nb">sudo </span>apt update
<span class="nb">sudo </span>apt <span class="nb">install </span>nginx
</code></pre></div>    </div>
  </li>
  <li>Create a new Nginx configuration file for your website:
    <div class="language-bash highlighter-rouge"><div class="highlight"><pre class="highlight"><code><span class="nb">sudo </span>nano /etc/nginx/sites-available/yoursite
</code></pre></div>    </div>
  </li>
  <li>Add the following configuration to the file:
    <div class="language-nginx highlighter-rouge"><div class="highlight"><pre class="highlight"><code><span class="c1"># Each server block defines a virtual server's routing behavior</span>
<span class="c1"># This server handles HTTP requests by redirecting them to HTTPS</span>
<span class="k">server</span> <span class="p">{</span>
 <span class="c1"># HTTP connections come in on port 80</span>
 <span class="kn">listen</span> <span class="mi">80</span><span class="p">;</span>
 <span class="kn">server_name</span> <span class="s">your_domain.com</span> <span class="s">www.your_domain.com</span><span class="p">;</span>
 <span class="c1"># Redirect those HTTP requests to HTTPS</span>
 <span class="kn">return</span> <span class="mi">301</span> <span class="s">https://</span><span class="nv">$host$request_uri</span><span class="p">;</span>
<span class="p">}</span>
<span class="c1"># This server handles HTTPS requests</span>
<span class="k">server</span> <span class="p">{</span>
 <span class="c1"># HTTPS connections come in on port 443</span>
 <span class="kn">listen</span> <span class="mi">443</span> <span class="s">ssl</span><span class="p">;</span>
 <span class="kn">server_name</span> <span class="s">your_domain.com</span> <span class="s">www.your_domain.com</span><span class="p">;</span>
 <span class="c1"># SSL certificate files - tell Nginx where to find proof that the domain is yours</span>
 <span class="kn">ssl_certificate</span> <span class="n">/etc/letsencrypt/live/your_domain.com/fullchain.pem</span><span class="p">;</span>
 <span class="kn">ssl_certificate_key</span> <span class="n">/etc/letsencrypt/live/your_domain.com/privkey.pem</span><span class="p">;</span>
 <span class="c1"># Set logs</span>
 <span class="kn">access_log</span> <span class="n">/var/log/nginx/yoursite.access.log</span><span class="p">;</span>
 <span class="kn">error_log</span> <span class="n">/var/log/nginx/yoursite.error.log</span><span class="p">;</span>
 <span class="c1"># Root directory for the website: tells Nginx where to find the files to serve</span>
 <span class="kn">root</span> <span class="n">/var/www/yoursite</span><span class="p">;</span>
 <span class="c1"># Default file to serve</span>
 <span class="kn">index</span> <span class="s">index.html</span><span class="p">;</span>
 <span class="c1"># This location block forwards API requests to your Gunicorn process</span>
 <span class="kn">location</span> <span class="n">/api/</span> <span class="p">{</span>
     <span class="kn">include</span> <span class="s">proxy_params</span><span class="p">;</span>
     <span class="kn">proxy_pass</span>         <span class="s">http://unix:/run/yoursite.sock</span><span class="p">;</span>
 <span class="p">}</span>
 <span class="c1"># All other requests will be served with static files</span>
 <span class="c1"># This makes any file in /var/www/yoursite accessible, so make sure not to expose sensitive files</span>
 <span class="c1"># Any file that is not found will return a 404 error</span>
 <span class="kn">location</span> <span class="n">/</span> <span class="p">{</span>
     <span class="kn">try_files</span> <span class="nv">$uri</span> <span class="nv">$uri</span><span class="n">/</span> <span class="p">=</span><span class="mi">404</span><span class="p">;</span>
 <span class="p">}</span>
<span class="p">}</span>
</code></pre></div>    </div>
    <p>Replace <code class="language-plaintext highlighter-rouge">your_domain.com</code> with your actual domain and set the correct paths to your SSL certificate files.<br />
<strong>Make sure not to expose sensitive files in your web root directory!</strong></p>
  </li>
  <li>Enable the new site configuration:
    <div class="language-bash highlighter-rouge"><div class="highlight"><pre class="highlight"><code><span class="nb">sudo ln</span> <span class="nt">-s</span> /etc/nginx/sites-available/yoursite /etc/nginx/sites-enabled/
</code></pre></div>    </div>
    <p>This creates a symbolic link between your site’s configuration file in <code class="language-plaintext highlighter-rouge">sites-available</code> and the <code class="language-plaintext highlighter-rouge">sites-enabled</code> directory, which Nginx uses to determine which sites to serve.</p>
  </li>
  <li>Test the Nginx configuration for syntax errors and fix any errors reported in the output:
    <div class="language-bash highlighter-rouge"><div class="highlight"><pre class="highlight"><code><span class="nb">sudo </span>nginx <span class="nt">-t</span>
</code></pre></div>    </div>
  </li>
  <li>If the test is successful, reload Nginx:
    <div class="language-bash highlighter-rouge"><div class="highlight"><pre class="highlight"><code><span class="nb">sudo </span>systemctl reload nginx
</code></pre></div>    </div>
  </li>
</ol>

<h2 id="monitoring">Monitoring</h2>

<p>We set up logging for both Nginx and Gunicorn to monitor the requests they are serving and any errors that pop up.</p>

<ol>
  <li><strong>Nginx Logs</strong>: We configured access and error logs in the Nginx configuration file:
    <div class="language-nginx highlighter-rouge"><div class="highlight"><pre class="highlight"><code> <span class="c1"># ...</span>
 <span class="c1"># Set logs</span>
 <span class="k">access_log</span> <span class="n">/var/log/nginx/yoursite.access.log</span><span class="p">;</span>
 <span class="k">error_log</span> <span class="n">/var/log/nginx/yoursite.error.log</span><span class="p">;</span>
 <span class="c1"># ...</span>
</code></pre></div>    </div>
  </li>
  <li><strong>Gunicorn Logs</strong>: We can also configured Gunicorn to log to a file with the <code class="language-plaintext highlighter-rouge">--access-logfile</code> and <code class="language-plaintext highlighter-rouge">--error-logfile</code> options in the <code class="language-plaintext highlighter-rouge">systemd.service</code> file:
    <div class="language-bash highlighter-rouge"><div class="highlight"><pre class="highlight"><code> <span class="c"># ...</span>
 <span class="nt">--access-logfile</span> /var/log/gunicorn/yoursite.access.log
 <span class="nt">--error-logfile</span> /var/log/gunicorn/yoursite.error.log
 <span class="c"># ...</span>
</code></pre></div>    </div>
  </li>
</ol>

<p>You can access these logs with either <code class="language-plaintext highlighter-rouge">cat</code> or <code class="language-plaintext highlighter-rouge">tail</code>. For instance:</p>
<div class="language-bash highlighter-rouge"><div class="highlight"><pre class="highlight"><code><span class="c"># View the last 100 lines of the access log</span>
<span class="nb">tail</span> <span class="nt">-n</span> 100 /var/log/nginx/yoursite.access.log
<span class="c"># View all of the Gunicorn error log</span>
<span class="nb">cat</span> /var/log/gunicorn/yoursite.error.log
</code></pre></div></div>]]></content><author><name>Matthew Ritch</name></author><category term="blog" /><category term="web development" /><category term="nginx" /><category term="digitalocean" /><category term="gunicorn" /><category term="django" /><category term="react" /><category term="dirtbag" /><summary type="html"><![CDATA[Learn to host a React + Django web app under your own domain name on your own server.]]></summary></entry><entry><title type="html">Web Dev for Dirtbags Part 1: Basics and Static Sites</title><link href="https://matthewritch.com/blog/2025/08/27/WDD-Static/" rel="alternate" type="text/html" title="Web Dev for Dirtbags Part 1: Basics and Static Sites" /><published>2025-08-27T10:30:00-04:00</published><updated>2025-08-27T10:30:00-04:00</updated><id>https://matthewritch.com/blog/2025/08/27/WDD-Static</id><content type="html" xml:base="https://matthewritch.com/blog/2025/08/27/WDD-Static/"><![CDATA[<ul id="markdown-toc">
  <li><a href="#purpose-hosting-a-static-webpage" id="markdown-toc-purpose-hosting-a-static-webpage">Purpose: hosting a static webpage</a></li>
  <li><a href="#static-html" id="markdown-toc-static-html">Static HTML</a></li>
  <li><a href="#a-basic-example" id="markdown-toc-a-basic-example">A basic example</a></li>
  <li><a href="#serving" id="markdown-toc-serving">Serving</a>    <ul>
      <li><a href="#register-a-domain-name" id="markdown-toc-register-a-domain-name">Register a domain name</a></li>
      <li><a href="#rent-a-vps" id="markdown-toc-rent-a-vps">Rent a VPS</a></li>
      <li><a href="#deploy-your-files" id="markdown-toc-deploy-your-files">Deploy your files</a></li>
      <li><a href="#set-up-ssl" id="markdown-toc-set-up-ssl">Set up SSL</a></li>
      <li><a href="#configure-nginx-for-static-file-hosting" id="markdown-toc-configure-nginx-for-static-file-hosting">Configure Nginx for static file hosting</a></li>
      <li><a href="#point-your-domain-name-to-the-vps" id="markdown-toc-point-your-domain-name-to-the-vps">Point your domain name to the VPS</a></li>
    </ul>
  </li>
</ul>

<p><em>Part 1 of Web Dev for Dirtbags. Next up: <a href="/blog/2025/09/02/WDD-Django-React/">Part 2: Deploying a Django + React Web App</a> and <a href="/blog/2025/09/03/WDD-VPS-Security/">Part 3: VPS Security</a>.</em></p>

<h2 id="purpose-hosting-a-static-webpage">Purpose: hosting a static webpage</h2>

<ol>
  <li>Learn to host a static webpage under your own domain name on your own server</li>
  <li>Gain web deployment skills:
    <ul>
      <li>working with remote servers</li>
      <li>registering a domain name and configuring your domain name service</li>
      <li>simple SSL setup</li>
      <li>basic Nginx configuration</li>
    </ul>
  </li>
</ol>

<p>Once you have learned these basics, you can move on to learning about <a href="https://matthewritch.com/blog/2025/09/02/WDD-Django-React/">dynamic site hosting</a>. Let’s start simple.</p>

<h2 id="static-html">Static HTML</h2>

<p>I like simple web pages. The simplest web pages are raw, static HTML files served over the internet.</p>

<p>Raw files are written directly in HTML and contain all the necessary information to display a web page. Static pages do not change based on user input and will always display the same content.</p>

<p>Let me show you what I mean. Open a text editor and paste this text into a new file. Save it as <code class="language-plaintext highlighter-rouge">index.html</code>.</p>

<div class="language-html highlighter-rouge"><div class="highlight"><pre class="highlight"><code><span class="cp">&lt;!DOCTYPE html&gt;</span>
<span class="nt">&lt;html&gt;</span>
    <span class="nt">&lt;head&gt;</span>
        <span class="nt">&lt;meta</span> <span class="na">charset=</span><span class="s">"UTF-8"</span><span class="nt">&gt;</span>
        <span class="nt">&lt;title&gt;</span>Web Dev for Dirtbags Part 1<span class="nt">&lt;/title&gt;</span>
    <span class="nt">&lt;/head&gt;</span>
    <span class="nt">&lt;body&gt;</span>
        Hello, Dirtbag!
    <span class="nt">&lt;/body&gt;</span>
<span class="nt">&lt;/html&gt;</span>
</code></pre></div></div>

<p>Double click that file and your browser will display a simple page. You get the idea.</p>

<p>There are <a href="https://www.google.com/search?q=writing+raw+html">plenty of guides</a> out there to help you write and style nice static web pages using HTML and CSS.</p>

<h2 id="a-basic-example">A basic example</h2>

<p>For the rest of this guide, I will assume that you have a web page with three files: <code class="language-plaintext highlighter-rouge">index.html</code>, <code class="language-plaintext highlighter-rouge">page2.html</code>, and <code class="language-plaintext highlighter-rouge">style.css</code>.</p>

<p><code class="language-plaintext highlighter-rouge">index.html</code>:</p>
<div class="language-html highlighter-rouge"><div class="highlight"><pre class="highlight"><code><span class="cp">&lt;!DOCTYPE html&gt;</span>
<span class="nt">&lt;html&gt;</span>
    <span class="nt">&lt;head&gt;</span>
        <span class="nt">&lt;meta</span> <span class="na">charset=</span><span class="s">"UTF-8"</span><span class="nt">&gt;</span>
        <span class="nt">&lt;title&gt;</span>This is index.html<span class="nt">&lt;/title&gt;</span>
        <span class="nt">&lt;link</span> <span class="na">rel=</span><span class="s">"stylesheet"</span> <span class="na">href=</span><span class="s">"style.css"</span><span class="nt">&gt;</span>
    <span class="nt">&lt;/head&gt;</span>
    <span class="nt">&lt;body&gt;</span>
        <span class="nt">&lt;h1&gt;</span>Hello, Dirtbag!<span class="nt">&lt;/h1&gt;</span>
        <span class="nt">&lt;p&gt;</span>This is a simple static web page.<span class="nt">&lt;/p&gt;</span>
        <span class="nt">&lt;a</span> <span class="na">href=</span><span class="s">"page2.html"</span><span class="nt">&gt;</span>Go to Page 2<span class="nt">&lt;/a&gt;</span>
    <span class="nt">&lt;/body&gt;</span>
<span class="nt">&lt;/html&gt;</span>
</code></pre></div></div>

<p><code class="language-plaintext highlighter-rouge">page2.html</code>:</p>
<div class="language-html highlighter-rouge"><div class="highlight"><pre class="highlight"><code><span class="cp">&lt;!DOCTYPE html&gt;</span>
<span class="nt">&lt;html&gt;</span>
    <span class="nt">&lt;head&gt;</span>
        <span class="nt">&lt;meta</span> <span class="na">charset=</span><span class="s">"UTF-8"</span><span class="nt">&gt;</span>
        <span class="nt">&lt;title&gt;</span>This is page2.html<span class="nt">&lt;/title&gt;</span>
        <span class="nt">&lt;link</span> <span class="na">rel=</span><span class="s">"stylesheet"</span> <span class="na">href=</span><span class="s">"style.css"</span><span class="nt">&gt;</span>
    <span class="nt">&lt;/head&gt;</span>
    <span class="nt">&lt;body&gt;</span>
        <span class="nt">&lt;h1&gt;</span>Go home, Dirtbag!<span class="nt">&lt;/h1&gt;</span>
        <span class="nt">&lt;p&gt;</span>This is another simple static web page.<span class="nt">&lt;/p&gt;</span>
        <span class="nt">&lt;a</span> <span class="na">href=</span><span class="s">"index.html"</span><span class="nt">&gt;</span>Go back home<span class="nt">&lt;/a&gt;</span>
    <span class="nt">&lt;/body&gt;</span>
<span class="nt">&lt;/html&gt;</span>
</code></pre></div></div>

<p><code class="language-plaintext highlighter-rouge">style.css</code>:</p>
<div class="language-css highlighter-rouge"><div class="highlight"><pre class="highlight"><code><span class="nt">body</span> <span class="p">{</span>
    <span class="nl">font-family</span><span class="p">:</span> <span class="n">Arial</span><span class="p">,</span> <span class="nb">sans-serif</span><span class="p">;</span>
    <span class="nl">margin</span><span class="p">:</span> <span class="m">0</span><span class="p">;</span>
    <span class="nl">padding</span><span class="p">:</span> <span class="m">0</span><span class="p">;</span>
<span class="p">}</span>
<span class="nt">h1</span> <span class="p">{</span>
    <span class="nl">color</span><span class="p">:</span> <span class="m">#4b2802</span><span class="n">ff</span><span class="p">;</span>
<span class="p">}</span>
<span class="nt">p</span> <span class="p">{</span>
    <span class="nl">color</span><span class="p">:</span> <span class="m">#7b1bab</span><span class="n">ff</span><span class="p">;</span>
<span class="p">}</span>
</code></pre></div></div>

<h2 id="serving">Serving</h2>

<p>Once you are happy with your page, you need to “serve” it so that others can access it as a web page. To do this, we will:</p>

<ol>
  <li>Register a domain name on a domain name registrar like Namecheap.</li>
  <li>Rent a virtual private server (VPS) from a service like DigitalOcean.</li>
  <li>Deploy your files to the VPS.</li>
  <li>Make an SSL certificate for your domain.</li>
  <li>Configure a web server for static file hosting. We will use Nginx for this.</li>
  <li>Point your domain name to the VPS.</li>
</ol>

<h3 id="register-a-domain-name">Register a domain name</h3>

<p>Domain names are just human-readable addresses for your website. When you open a web browser and type in a URL, the browser uses the domain name to locate the server hosting the website and ask it for the page you want to see. Take <code class="language-plaintext highlighter-rouge">https://www.thecleaners.ai</code> for instance. The domain name is <code class="language-plaintext highlighter-rouge">thecleaners.ai</code>, and it points to a specific server on the internet.</p>

<p>Domain names must be registered with a domain name registrar. There are many registrars to choose from, such as Namecheap, GoDaddy, and Google Domains. Simply create an account with one of these registrars, search for a domain name that suits your page, and follow the instructions to register it. You can probably find a suitable one for less than $10.</p>

<h3 id="rent-a-vps">Rent a VPS</h3>

<p>To serve your website, you need a computer that will sit there waiting for requests from users. You could use your laptop for this, but that means that you would need to keep it on with a reliable internet connection 24/7 and expose its contents to the internet.</p>

<p>Instead rent a virtual private server (VPS) from a service like DigitalOcean. A VPS can easily sit there for you 24/7 and answer requests and won’t have any of your personal files on it, so this is a much better option.</p>

<p>While setting up your VPS, they will present you with options for your server’s resources like CPU, RAM, and storage. Your site is simple, so pick the cheapest option. Namecheap has a $4/month budget option.</p>

<p>Once you have set this up, note the IP address. Try to <a href="https://www.man7.org/linux/man-pages/man1/ssh.1.html"><code class="language-plaintext highlighter-rouge">ssh</code></a> (Secure Shell) into your VPS using the following command:</p>

<div class="language-bash highlighter-rouge"><div class="highlight"><pre class="highlight"><code>ssh username@vps_ip_address
</code></pre></div></div>

<p>Replace <code class="language-plaintext highlighter-rouge">username</code> with your VPS username (configure this on the provider’s dashboard) and <code class="language-plaintext highlighter-rouge">vps_ip_address</code> with the IP address of your VPS (find this in the provider’s dashboard). You could also set up SSH keys for passwordless login, but don’t worry about that if you don’t know what that means.</p>

<p>If your ssh worked, you should see a terminal prompt for your VPS. You can now run commands on your VPS as if you were sitting in front of it.</p>

<p>While you’re connected, go ahead and create a directory for your website files:</p>

<div class="language-bash highlighter-rouge"><div class="highlight"><pre class="highlight"><code><span class="nb">mkdir</span> <span class="nt">-p</span> /var/www/your_website
</code></pre></div></div>

<h3 id="deploy-your-files">Deploy your files</h3>

<p>Next, to serve your website, you need to get your files to the VPS. The most common way is to use <code class="language-plaintext highlighter-rouge">git</code> and a remote repository on a service like GitHub (free for you, most likely). This allows you to easily update your code in the future.</p>

<p>However, if you don’t know what <code class="language-plaintext highlighter-rouge">git</code> is or if you’re a real dirtbag, you can use <a href="https://man7.org/linux/man-pages/man1/scp.1.html"><code class="language-plaintext highlighter-rouge">scp</code></a> (secure copy) to copy files between your local machine and the VPS.</p>

<p>To use <code class="language-plaintext highlighter-rouge">scp</code>, open a terminal (or PowerShell on Windows) on your local machine and run the following commands:</p>

<div class="language-bash highlighter-rouge"><div class="highlight"><pre class="highlight"><code>zip <span class="nt">-r</span> site.zip /path/to/your/folderwithallfiles <span class="c"># create a zip archive of your site</span>
scp site.zip username@vps_ip_address:/var/www/your_website <span class="c"># copy the zip file to the VPS</span>
</code></pre></div></div>

<p>Then, ssh into the VPS:</p>

<div class="language-bash highlighter-rouge"><div class="highlight"><pre class="highlight"><code>ssh username@vps_ip_address <span class="c"># ssh into the VPS</span>
<span class="nb">ls</span> /var/www/your_website
unzip site.zip <span class="c"># extract the zip file on the VPS</span>
</code></pre></div></div>

<p>Replace <code class="language-plaintext highlighter-rouge">/path/to/your/folderwithallfiles</code> with the path to the folder with all of your site files, <code class="language-plaintext highlighter-rouge">username</code> with your VPS username, <code class="language-plaintext highlighter-rouge">vps_ip_address</code> with the IP address of your VPS, and <code class="language-plaintext highlighter-rouge">/var/www/your_website</code> with the VPS directory you created to hold the site files.</p>

<h3 id="set-up-ssl">Set up SSL</h3>

<p>People won’t trust your website if you are not using HTTPS. To serve your website over HTTPS, you need an SSL certificate.</p>

<p>The easiest way to get one is with <a href="https://letsencrypt.org/">Let’s Encrypt</a>, which provides free SSL certificates.</p>

<ol>
  <li>Install Certbot on your VPS:
    <div class="language-bash highlighter-rouge"><div class="highlight"><pre class="highlight"><code><span class="nb">sudo </span>apt <span class="nb">install </span>certbot python3-certbot-nginx
</code></pre></div>    </div>
  </li>
  <li>Obtain an SSL certificate:
    <div class="language-bash highlighter-rouge"><div class="highlight"><pre class="highlight"><code><span class="nb">sudo </span>certbot <span class="nt">--nginx</span> <span class="nt">-d</span> your_domain.com <span class="nt">-d</span> www.your_domain.com
</code></pre></div>    </div>
  </li>
</ol>

<p>Follow the prompts to complete the certificate issuance process.</p>

<p>Note where the SSL certificate files are stored (usually in <code class="language-plaintext highlighter-rouge">/etc/letsencrypt/live/your_domain.com/</code>).</p>

<h3 id="configure-nginx-for-static-file-hosting">Configure Nginx for static file hosting</h3>

<p>Now that your VPS has your website files, you need to tell it how to serve them to site visitors. We’ll use Nginx for this.</p>

<ol>
  <li>Install Nginx on your VPS:
    <div class="language-bash highlighter-rouge"><div class="highlight"><pre class="highlight"><code><span class="nb">sudo </span>apt update
<span class="nb">sudo </span>apt <span class="nb">install </span>nginx
</code></pre></div>    </div>
  </li>
  <li>Create a new Nginx configuration file for your website:
    <div class="language-bash highlighter-rouge"><div class="highlight"><pre class="highlight"><code><span class="nb">sudo </span>nano /etc/nginx/sites-available/your_website
</code></pre></div>    </div>
  </li>
  <li>Add the following configuration to the file:
    <div class="language-nginx highlighter-rouge"><div class="highlight"><pre class="highlight"><code><span class="c1"># Each server block defines a virtual server's routing behavior</span>
<span class="c1"># This server handles HTTP requests by redirecting them to HTTPS</span>
<span class="k">server</span> <span class="p">{</span>
 <span class="c1"># HTTP connections come in on port 80</span>
 <span class="kn">listen</span> <span class="mi">80</span><span class="p">;</span>
 <span class="kn">server_name</span> <span class="s">your_domain.com</span> <span class="s">www.your_domain.com</span><span class="p">;</span>
 <span class="c1"># Redirect those HTTP requests to HTTPS</span>
 <span class="c1"># 301 is a permanent redirect code</span>
 <span class="kn">return</span> <span class="mi">301</span> <span class="s">https://</span><span class="nv">$host$request_uri</span><span class="p">;</span>
<span class="p">}</span>
<span class="c1"># This server handles HTTPS requests</span>
<span class="k">server</span> <span class="p">{</span>
 <span class="c1"># HTTPS connections come in on port 443</span>
 <span class="kn">listen</span> <span class="mi">443</span> <span class="s">ssl</span><span class="p">;</span>
 <span class="kn">server_name</span> <span class="s">your_domain.com</span> <span class="s">www.your_domain.com</span><span class="p">;</span>
 <span class="c1"># SSL certificate files - tell Nginx where to find proof that the domain is yours</span>
 <span class="kn">ssl_certificate</span> <span class="n">/etc/letsencrypt/live/your_domain.com/fullchain.pem</span><span class="p">;</span>
 <span class="kn">ssl_certificate_key</span> <span class="n">/etc/letsencrypt/live/your_domain.com/privkey.pem</span><span class="p">;</span>
 <span class="c1"># Root directory for the website: tells Nginx where to find the files to serve</span>
 <span class="kn">root</span> <span class="n">/var/www/your_website</span><span class="p">;</span>
 <span class="c1"># Default file to serve</span>
 <span class="kn">index</span> <span class="s">index.html</span><span class="p">;</span>
 <span class="c1"># Handle all other requests</span>
 <span class="c1"># This makes any file in /var/www/your_website accessible, so make sure not to expose sensitive files</span>
 <span class="c1"># Any file that is not found will return a 404 error</span>
 <span class="kn">location</span> <span class="n">/</span> <span class="p">{</span>
     <span class="kn">try_files</span> <span class="nv">$uri</span> <span class="nv">$uri</span><span class="n">/</span> <span class="p">=</span><span class="mi">404</span><span class="p">;</span>
 <span class="p">}</span>
<span class="p">}</span>
</code></pre></div>    </div>
    <p>Replace <code class="language-plaintext highlighter-rouge">your_domain.com</code> with your actual domain and set the correct paths to your SSL certificate files.</p>
  </li>
  <li>Enable the new site configuration:
    <div class="language-bash highlighter-rouge"><div class="highlight"><pre class="highlight"><code><span class="nb">sudo ln</span> <span class="nt">-s</span> /etc/nginx/sites-available/your_website /etc/nginx/sites-enabled/
</code></pre></div>    </div>
    <p>This creates a symbolic link between your site’s configuration file in <code class="language-plaintext highlighter-rouge">sites-available</code> and the <code class="language-plaintext highlighter-rouge">sites-enabled</code> directory, which Nginx uses to determine which sites to serve.</p>
  </li>
  <li>Test the Nginx configuration for syntax errors and fix any errors reported in the output:
    <div class="language-bash highlighter-rouge"><div class="highlight"><pre class="highlight"><code><span class="nb">sudo </span>nginx <span class="nt">-t</span>
</code></pre></div>    </div>
  </li>
  <li>If the test is successful, reload Nginx:
    <div class="language-bash highlighter-rouge"><div class="highlight"><pre class="highlight"><code><span class="nb">sudo </span>systemctl reload nginx
</code></pre></div>    </div>
  </li>
</ol>

<h3 id="point-your-domain-name-to-the-vps">Point your domain name to the VPS</h3>

<p>Finally, you need to point your domain name to your VPS’s IP address.</p>

<p>First, on your domain name registrar’s website, Follow your registrar’s instructions for delegating nameservers to your VPS.</p>

<p>See your registrar’s documentation for specific instructions about nameserver. If DigitalOcean is your VPS provider, follow <a href="https://docs.digitalocean.com/products/networking/dns/getting-started/dns-registrars/">this guide</a> and add the following nameservers: <code class="language-plaintext highlighter-rouge">ns1.digitalocean.com</code>, <code class="language-plaintext highlighter-rouge">ns2.digitalocean.com</code>, and <code class="language-plaintext highlighter-rouge">ns3.digitalocean.com</code>.</p>

<p>Second, on your VPS provider’s control panel, update the DNS settings for your domain to point to your VPS’s IP address. Your VPS provider should have documentation on how to do this. For DigitalOcean, see <a href="https://docs.digitalocean.com/products/networking/dns/getting-started/quickstart/">this guide</a>.</p>

<p>Now, after a few minutes, your domain should point to your VPS, and you should be able to access your website using your domain name!</p>]]></content><author><name>Matthew Ritch</name></author><category term="blog" /><category term="web development" /><category term="nginx" /><category term="digitalocean" /><category term="static site" /><category term="dirtbag" /><summary type="html"><![CDATA[Learn to host a static webpage under your own domain name on your own server.]]></summary></entry></feed>